This post is a part of AI April initiative, where each day of April my colleagues publish new original article related to AI, Machine Learning and Microsoft. Have a look at the Calendar to find other interesting articles that have already been published, and keep checking that page during the month.
In my earlier post, I described Cognitive Portrait technique to produce blended portraits of people from a series of photographs:
This January, Moscow ElectroMuseum made a call to all artists to submit their ideas for OpenMuseum exhibition, so I immediately thought of turning Cognitive Portrait idea into something more interactive. What I wanted to create is an interactive stand that will capture photographs of people passing nearby, and transform them into “average” photograph of exhibition visitors.
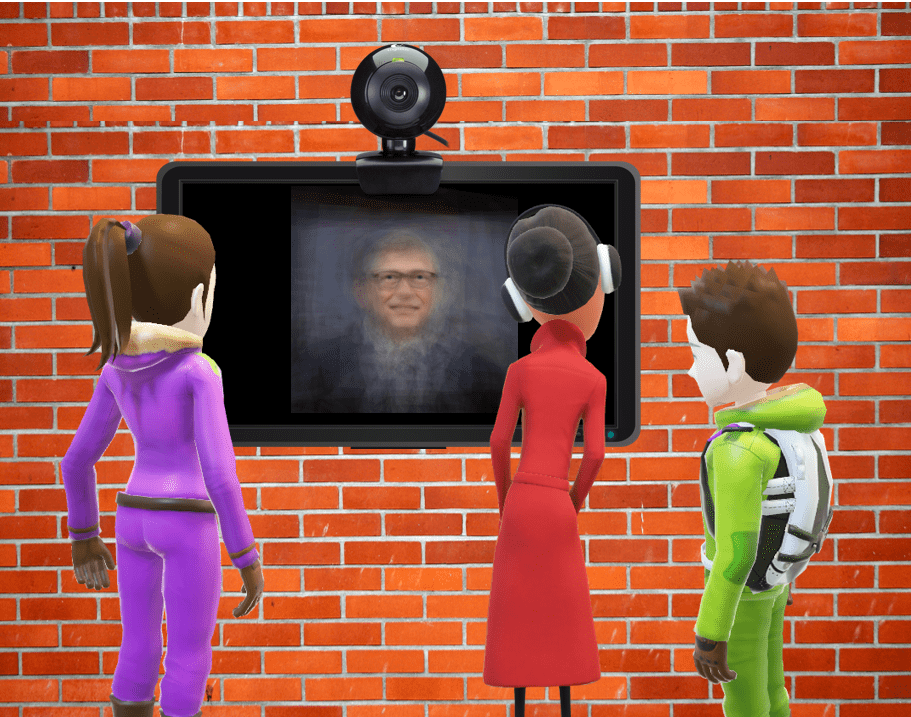
Because Cognitive Portrait relies on using Cognitive Services to extract face landmarks, the exhibit needs to be Internet-connected. This provides some additional advantages, such as:
- Storing produced images and making them available for later expositions
- Being able to collect demographic portrait of people at the exhibition, including age distribution, gender, and the amount of time people spend in front of the exhibit. I will not explore this functionality in this post, though.
- If you want to chose different cognitive portrait technique, you would only need to change the functionality in the cloud, so you can in fact change exhibits without physically visiting the museum.
The Architecture
From architectural point of view, the exhibit consists of two parts:
- Client UWP application, which runs on a computer with the monitor and web cam installed at the museum. UWP application can also be run on Raspberry Pi on Windows IoT Core. Client application does the following:
- Detects a person standing in front of the camera
- When a person stays rather still for a few seconds - it will take the picture and send it to the cloud
- When a result is received from the cloud - show it on the screen / monitor.
- Cloud backend, which does the following:
- Receive the picture from the client
- Apply affine transformation to align the picture with predefined eyes coordinates and store the result
- Create the result from a few previous pictures (which already have been aligned) and return it to the client
Below, we will discuss different options for implementing client and cloud parts, and select the best ones.
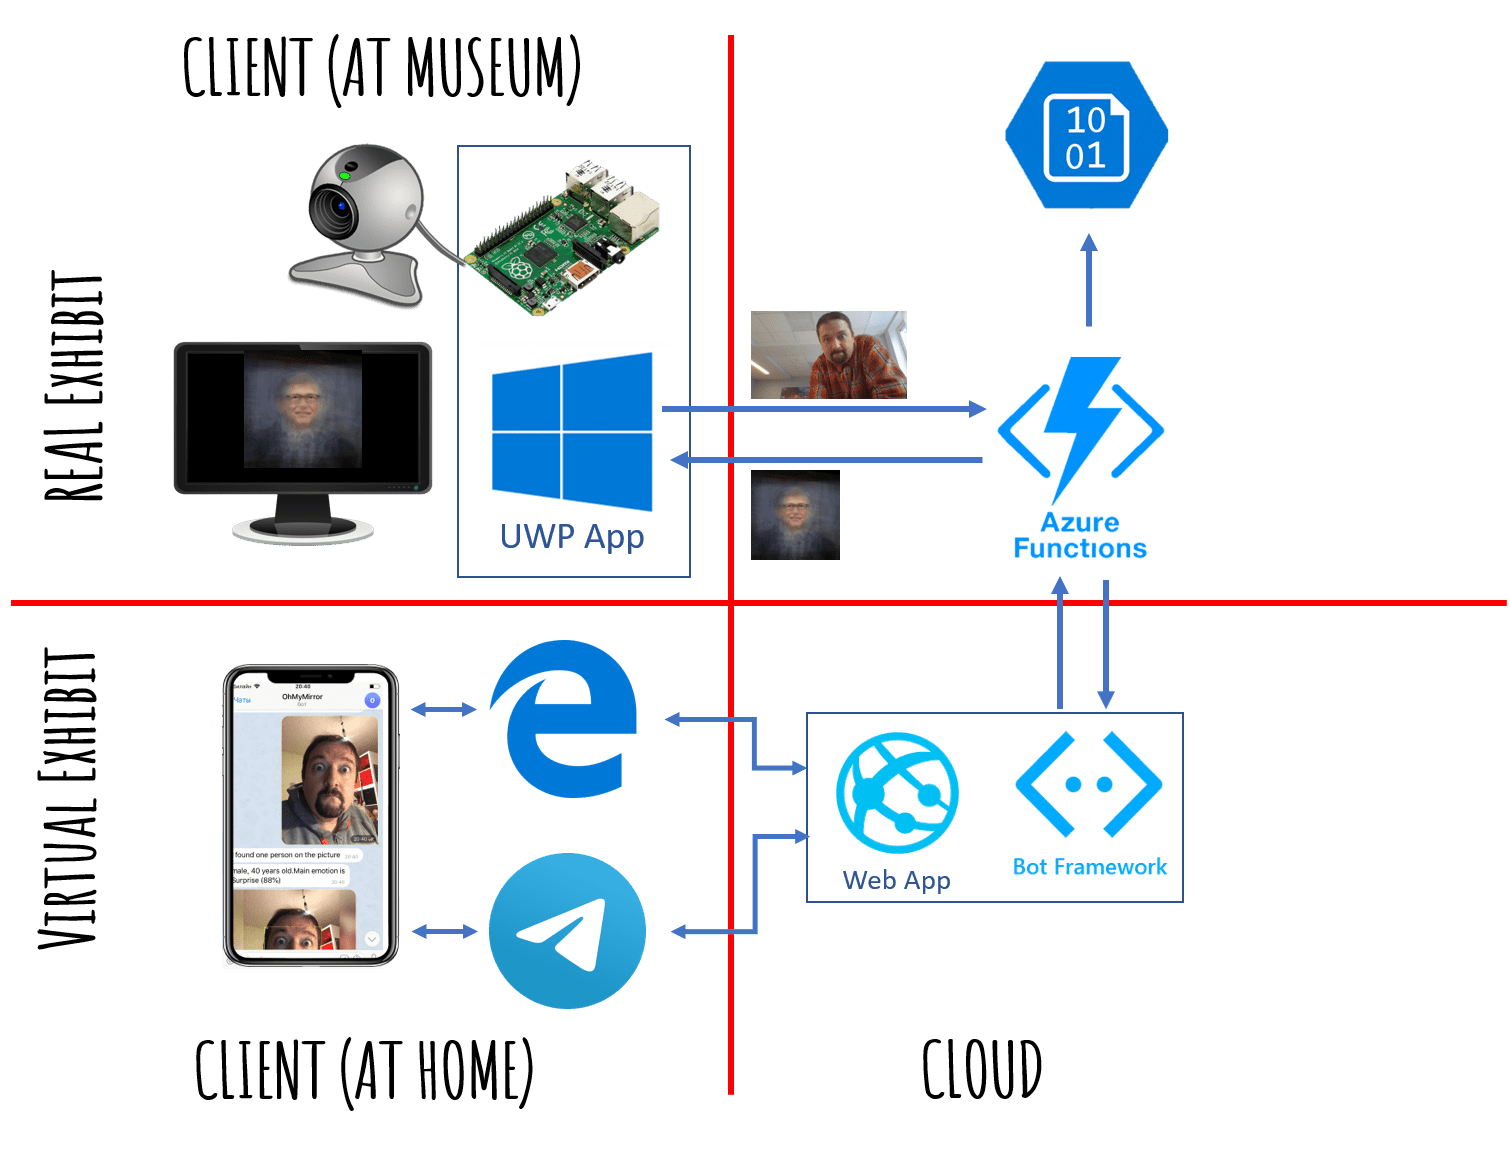
Virtual Exhibit Bot
When the exhibit has already been developed and demonstrated in the museum for a few weeks, the news came up that the museum will be closed for quarantine for indefinite period of time. The news sparkled the idea to turn the exhibit into the virtual one, so that people can interact with it without leaving their house.
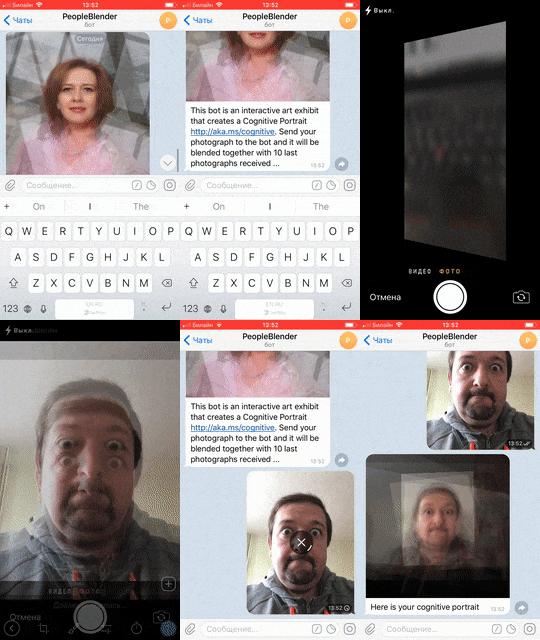
The interaction is done via Telegram chat-bot @PeopleBlenderBot. The bot calls cloud backend via the same REST API as the UWP client application, and the image that it receives back is given as the bot response. Thus, a user is able to send his picture, and get back its people-blended version, which incorporates other users of the bot, together with real people in the gallery.
With @PeopleBlenderBot, the exhibit spans both real and virtual worlds, blending people’s faces from their homes and from the exhibition together into one collective image. This new kind of virtual art is a true way to break boundaries and bring people together regardless of their physical location, city or country. You can test the bot here.
UWP Client Application
The main reason why I chose to use Universal Windows Applications platform for client application is because it has face detection functionality out of the box. Also, it is available on Raspberry Pi controller, through the use of Windows 10 IoT Core, however, it turns out to be quite slow, so for my exhibit I used Intel NUC compact computer.
User interface of our application would look like this:
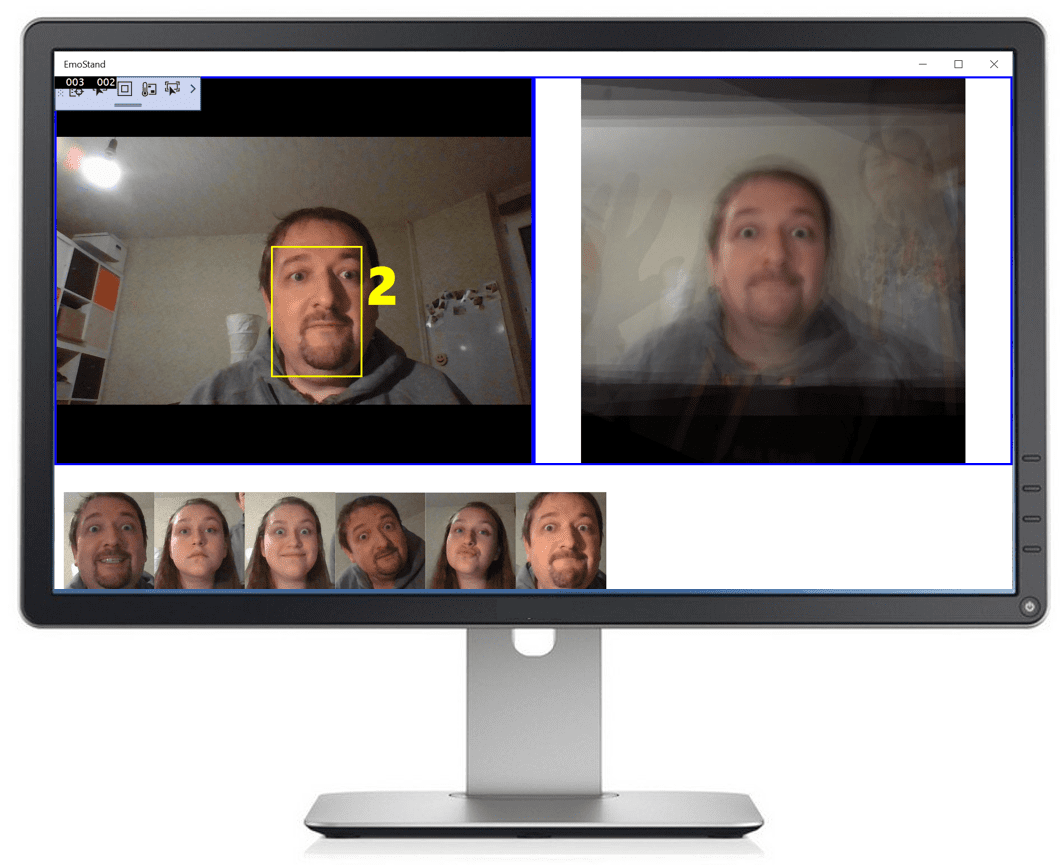
Corresponding XAML layout (slightly simplified) is like this:
<Grid Background="{ThemeResource ApplicationPageBackgroundThemeBrush}">
    <Grid.ColumnDefinitions>
        <ColumnDefinition Width="*"/>
        <ColumnDefinition Width="*"/>
    </Grid.ColumnDefinitions>
    <Grid.RowDefinitions>
        <RowDefinition Height="*"/>
        <RowDefinition Height="170"/>
    </Grid.RowDefinitions>
    <Grid x:Name="FacesCanvas" Grid.Row="0" Grid.Column="0">
        <CaptureElement x:Name="ViewFinder" />
        <Rectangle x:Name="FaceRect"/>
        <TextBlock x:Name="Counter" FontSize="60"/>
    </Grid>
    <Grid x:Name="ResultCanvas" Grid.Row="0" Grid.Column="1">
        <Image x:Name="ResultImage" Source="Assets/bgates.jpg"/>
    </Grid>
    <ItemsControl x:Name="FacesLine" Grid.Row="1" Grid.ColumnSpan="2"
              ItemsSource="{x:Bind Faces,Mode=OneWay}"/>
</Grid>
Here the most important elements are:
ViewFinder to display the live feed from the cameraFaceRect and Counter are elements overlayed on top of ViewFinder to display the rectangle around recognized face, and to provide countdown timer to display 3-2-1 before the picture is takenResultImage is the area to display the result received from the cloudFacesLine is the horizontal line of captured faces of previous visitors displayed at the bottom of the screen. It is declaratively bound to Faces observable collection in our C# code, so to display a new face we just need to add an element to it- All the rest of XAML code is used to lay out the elements properly.
The code to implement face detection is available in this sample. It is a little bit overcomplicated, so I took liberty so simplify it a bit, and will simplify it even further for the sake of clarity.
First, we need to start the camera, and render it’s output into the ViewFinder:
MC = new MediaCapture();
var cameras = await DeviceInformation.FindAllAsync(
                              DeviceClass.VideoCapture);
var camera = cameras.First();
var settings = new MediaCaptureInitializationSettings()
                          { VideoDeviceId = camera.Id };
await MC.InitializeAsync(settings);
ViewFinder.Source = MC;
Then, we create FaceDetectionEffect, which will be responsible for detecting faces. Once the face is detected, it will fire FaceDetectedEvent:
var def = new FaceDetectionEffectDefinition();
def.SynchronousDetectionEnabled = false;
def.DetectionMode = FaceDetectionMode.HighPerformance;
FaceDetector = (FaceDetectionEffect)
     (await MC.AddVideoEffectAsync(def, MediaStreamType.VideoPreview));
FaceDetector.FaceDetected += FaceDetectedEvent;
FaceDetector.DesiredDetectionInterval = TimeSpan.FromMilliseconds(100);
FaceDetector.Enabled = true;
await MC.StartPreviewAsync();
Once face is detected and FaceDetectedEvent is called, we start the countdown timer that will fire every second, and update the Counter textbox to display 3-2-1 message. Once the counter reaches 0, it captures the image from camera to MemoryStream, and calls the web service in the cloud using CallCognitiveFunction:
var ms = new MemoryStream();
await MC.CapturePhotoToStreamAsync(
      ImageEncodingProperties.CreateJpeg(), ms.AsRandomAccessStream());
var cb = await GetCroppedBitmapAsync(ms,DFace.FaceBox);
Faces.Add(cb);
var url = await CallCognitiveFunction(ms);
ResultImage.Source = new BitmapImage(new Uri(url));
We assume that the REST service will take the input image, do all the magic to create the resulting image, store it somewhere in the cloud in the public blob, and return the URL of the image. We then assign this URL to the Source property of ResultImage control, which renders the image on the screen (and UWP runtime is responsible for downloading image from the cloud).
What also happens here, the face is cut out from the picture using GetCroppedBitmapAsync, and added to Faces collection, which makes it automatically appear on the UI.
CallCognitiveFunction does pretty standard call to REST endpoint using HttpClient library:
private async Task<string> CallCognitiveFunction(MemoryStream ms)
{
    ms.Position = 0;
    var resp = await http.PostAsync(function_url,new StreamContent(ms));
    return await resp.Content.ReadAsStringAsync();
}
Azure Function to Create Cognitive Portrait
To do the main job, we will create an Azure Function in Python. Using Azure Functions to manage executable code in the cloud has many benefits:
- You do not have to think about the dedicated compute, i.e. how and where the code is executed. That’s why Azure Functions are also called Serverless.
- In Functions consumption plan, you only pay for the actual function calls, and not for the uptime of the function. The only downside of this plan is that function execution time is limited, and if the call takes a long time to execute - it will time out. In our case, this should not be a problem, as our algorithm is pretty fast.
- Function is auto-scaled based on demand, so we don’t have to manage scalability explicitly.
- Azure Function can be triggered by many different cloud events. In our case, we will fire the function using REST call, but it can also fire as a result of adding blob to storage account, or from new queue message.
- Azure Function can be simply integrated with storage in declarative manner.
Just an example: suppose we want to imprint current date on a photograph. We can write a function, specify that it is triggered by a new blob item, and that output of the function should go to another blob. To implement the imprinting, we just need to provide the code for image manipulation, while input and output image will be taken from blob and stored into blob automatically, we will just use them as function parameters.
Azure Functions are so useful that my rule of thumb is to always use Azure Functions whenever you need to do some relatively simple processing in the cloud.
In our case, because Cognitive Portrait algorithm is developed in Python and requires OpenCV, we will create Python Azure Function. In fact, the new version (V2) of Python functions have been significantly improved, so if you have heard something bad about Python implementation of Azure Functions before - forget all about it.
The easiest way to start developing a function is by starting to code locally. The process is well-described in documentation, but let me outline it here. You may also read this tutorial to get familiar with doing some operations from VS Code.
First, you create a function using CLI:
func init coportrait –python
cd coportrait
func new --name pdraw --template "HTTP trigger"
To use this command, you would need to have Azure Functions Core Tools installed.
The function is mainly described by two files: one contains the Python code (in our case, it is __init__.py), and another one - function.json - describes the integrations, i.e. how the function is triggered, and which Azure objects are passed to/from function as input/output parameters.
For our simple function triggered by HTTP request, the function.json would look like this:
{
  "scriptFile": "__init__.py",
  "bindings": [
    {
      "authLevel": "function",
      "type": "httpTrigger",
      "direction": "in",
      "name": "req",
      "methods": [ "post" ]},
    {
      "type": "http",
      "direction": "out",
      "name": "$return" }]}
Here the name of script file is specified, the input parameter is named req and bound to incoming HTTP trigger, and output parameter is the HTTP response, which is returned as function value ($return). We also specify here that the function supports only POST method - I have removed "get", which was present there initially from the template.
If we look into __init__.py, we have some template code there to start with, which looks like this (in practice, it’s a little bit more complicated than this, but never mind):
def main(req:func.HttpRequest) -> func.HttpResponse:
    logging.info('Execution begins…')
    return func.HttpResponse(f"Hello {name}!")
Here, req is the original request. To get the input image, which is encoded as binary JPEG stream, we need the following code:
body = req.get_body()
nparr = np.fromstring(body, np.uint8)
img = cv2.imdecode(nparr, cv2.IMREAD_COLOR)
To work with storage, in our case we will use azure.storage.blob.BlockBlobService object, and not integrations. The reason for this is that we need quite a lot of storage operations, and passing many parameters in and out of the function may be confusing. You may want to see more documentation on working with Azure blob storage from Python.
So we will begin by storing the incoming image into cin blob container:
blob = BlockBlobService(account_name=..., account_key=...)
sec_p = int((end_date-datetime.datetime.now()).total_seconds())
name =  f"{sec_p:09d}-{time.strftime('%Y%m%d-%H%M%S')}"
blob.create_blob_from_bytes("cin",name,body)
We need to do one trick here with file naming. Because later on we will need to be blending together 10 last photographs, we need a way to retrieve 10 last files without browsing through all blobs in a container. Since blob names are returned in alphabetical order, we need a way for all filenames to be sorted alphabetically in ascending order, last file being the first. The way I solve this problem here is to calcuclate the number of seconds from current time till January 1, 2021, and appending this number with leading zeroes before the filename (which is normal YYYYMMDD-HHMMSS datetime).
Next things we will do is call Face API to extract face landmarks and position the image so that two eyes and middle of the mouth occupy predefined coordinates:
cogface = cf.FaceClient(cognitive_endpoint,
                        CognitiveServicesCredentials(cognitive_key))
res = cogface.face.detect_with_stream(io.BytesIO(body),
                        return_face_landmarks=True)
if res is not None and len(res)>0:
    tr = affine_transform(img,res[0].face_landmarks.as_dict())
    body = cv2.imencode('.jpg',tr)[1]
    blob.create_blob_from_bytes("cmapped",name,body.tobytes())
Function affine_transform is the same as in my other post. Once the image has been transformed, it is stored as JPEG picture into cmapped blob container.
As the last step, we need to prepare the image from the last 10 pictures, store it into the blob, and return the URL. To get last 10 images from blob, we get the iterator for all blobs using list_blobs function, take first 10 elements using islice, and then get the decoded images:
imgs = [ imdecode(blob.get_blob_to_bytes("cmapped",x.name).content)
         for x in itertools.islice(blob.list_blobs("cmapped"),10) ]
imgs = np.array(imgs).astype(np.float32)
To get the blended picture, we need to average all images along the first axis, which is done with just one numpy call. To make this averaging possible, we convert all values in the code above to np.float32, and after averaging - back to np.uint8:
res = (np.average(imgs,axis=0)).astype(np.uint8)
Finally, storing the image in blob is done in a very similar manner to the code above, encoding the image to JPEG with cv2.imencode, and then calling create_blob_from_bytes:
b = cv2.imencode('.jpg',res)[1]
r = blob.create_blob_from_bytes("out",f"{name}.jpg",b.tobytes())
result_url = f"https://{act}.blob.core.windows.net/out/{name}.jpg"
return func.HttpResponse(result_url)
After putting the function code into __init__.py, we also should not forget to specify all dependencies in requirements.txt:
azure-functions
opencv-python
azure-cognitiveservices-vision-face
azure-storage-blob==1.5.0
Once this is done, we can run the function locally by issuing the command:
This command will start a local web server and print the URL of the function, which we can try to call using Postman to make sure that it works. We need to make sure to use POST method, and to pass the original image as binary body of the request. We can also specify this URL to function_url variable in our UWP application, and run it on local machine.
To publish Azure Function to the cloud, we need first to create the Python Azure Function through the Azure Portal, or through Azure CLI:
az functionapp create --resource-group PeopleBlenderBot
    --os-type Linux   --consumption-plan-location westeurope
    --runtime python  --runtime-version 3.7
    --functions-version 2
    --name coportrait --storage-account coportraitstore
I recommend doing it through the Azure Portal, because it will automatically create required blob storage, and the whole process is easier for beginners. Once you start looking for ways to automate it - go with Azure CLI.
After the function has been created, deploying it is really easy:
func azure functionapp publish coportrait
After the function has been published, go to Azure Portal, look for the function and copy function URL. 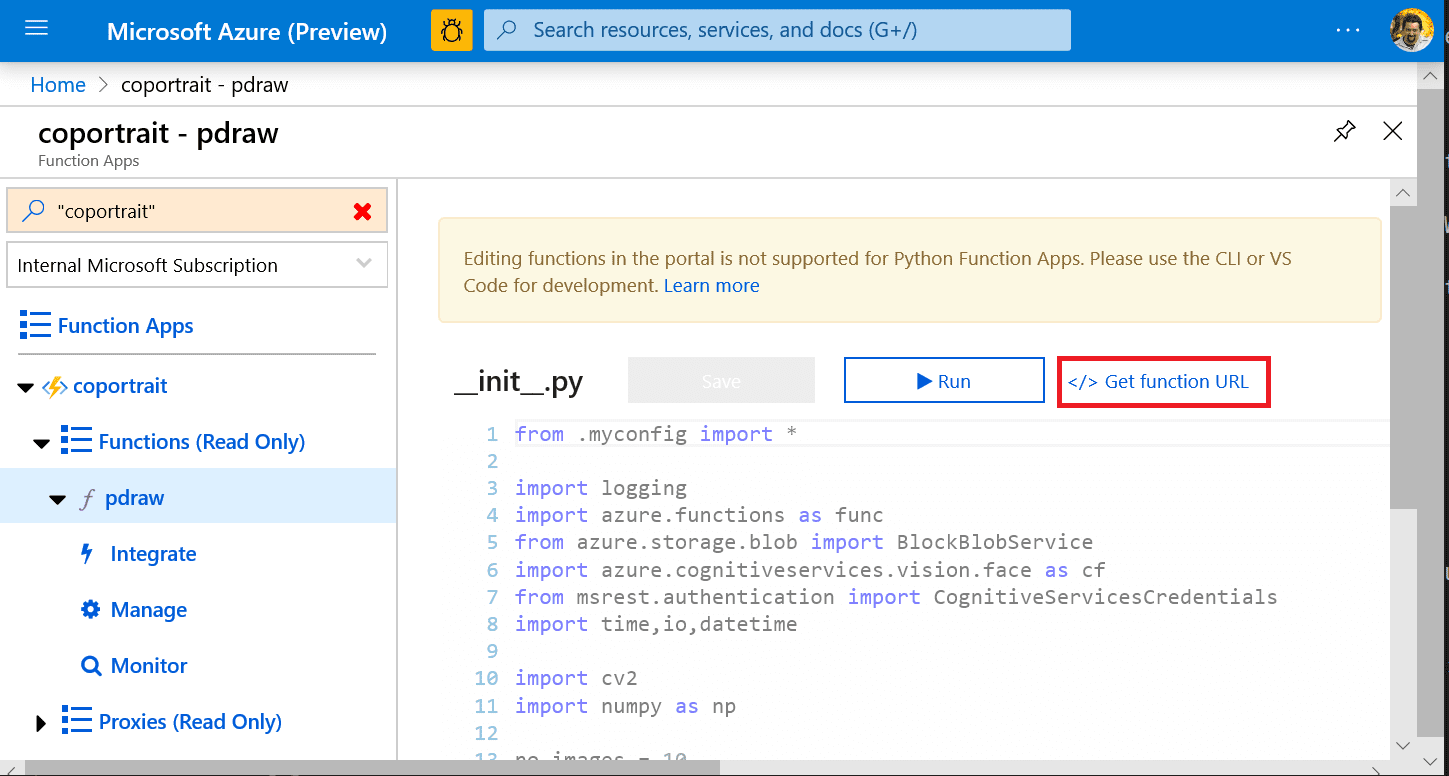
The URL should look similar to this: https://coportrait.azurewebsites.net/api/pdraw?code=geE..e3P==. Assign this link (together with the key) to the function_url variable in your UWP app, start it, and you should be good to go!
Creating the Chat Bot
During social isolation, we need to create a way for people to interact with the exhibit from their homes. The best way to do it is by creating a chat bot using Microsoft Bot Framework.
In the described architecture all the processing happens in the cloud, which makes it possible to create additional user interfaces to the same virtual exhibit. Let’s go ahead and create chatbot interface using Microsoft Bot Framework.
The process of creating a bot in C# is described in Microsoft Docs, or in this short tutorial. You can also create the bot in Python, but we will go with .NET as the better documented option.
First of all, we need to install VS Bot Template for Visual Studio, and then create Bot project with the Echo template: 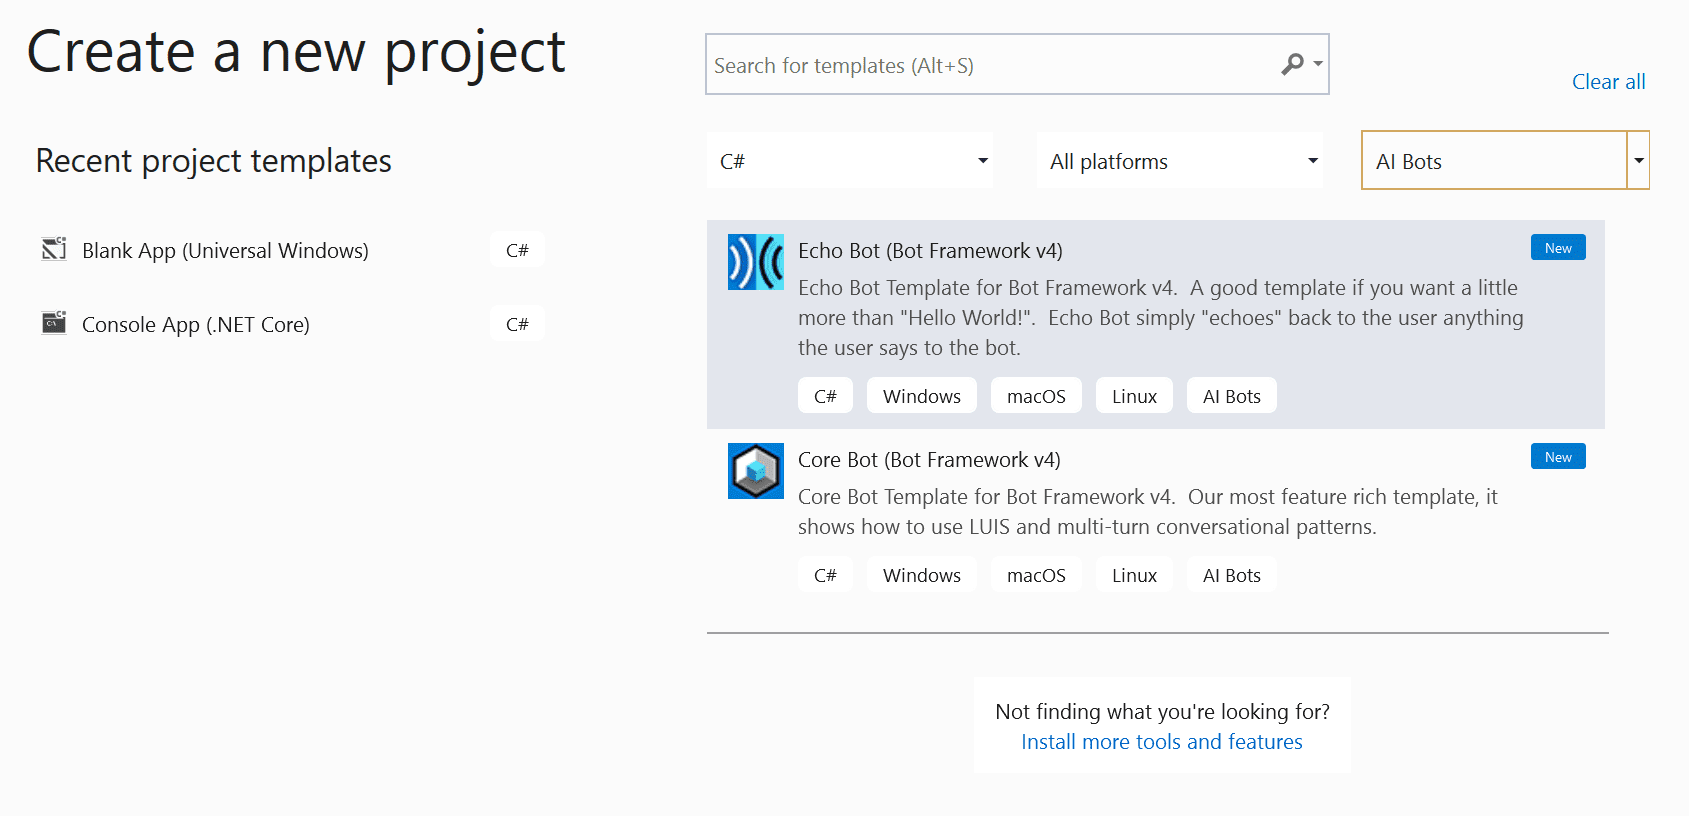 I will call the project
 PeopleBlenderBot.
Main logic of the bot is located in Bots\EchoBot.cs file, inside the OnMessageActivityAsync function. This function received the incoming message as the Activity object, which contains message Text, as well as its Attachments. We first need to check if the user has attached in image to his message:
if (turnContext.Activity.Attachments?.Count>0)
{
   // do the magic
}
else
{
    await turnContext.SendActivityAsync("Please send picture");
}
If the user has attached an image, it will be available to us as ContentUrl field of Attachment object. Inside the if block, we first get this image as http-stream:
  var http = new HttpClient();
  var resp = await http.GetAsync(Attachments[0].ContentUrl);
  var str = await resp.Content.ReadAsStreamAsync();
Then, we pass this stream to our Azure function, in the same way as we did in the UWP application:
  resp = await http.PostAsync(function_url, new StreamContent(str));
  var url = await resp.Content.ReadAsStringAsync();
Now that we obtained the URL of the image, we need to pass it back to the user as Hero-card attachment:
  var msg = MessageFactory.Attachment(
      (new HeroCard()
      { Images = new CardImage[] { new CardImage(url) } }
      ).ToAttachment());
  await turnContext.SendActivityAsync(msg);
Now you can run the bot locally and test it using Bot Framework Emulator: 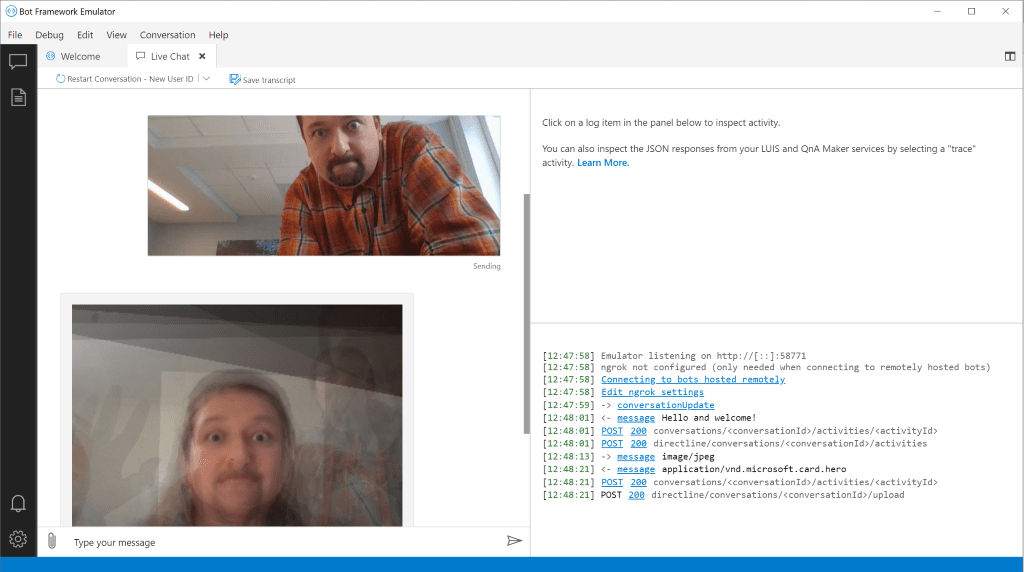
Once you make sure the bot works, you can deploy it to Azure as described in Docs using Azure CLI and ARM template. However, you can also do it manually through Azure Portal:
- Create new Web App Bot in the portal, selecting Echo Bot as the starting template. This will create the following two objects in your subscription:
- Bot Connector App, which determines the connection between the bot and different channels, such as Telegram
- Bot Web App, where the bot web application itself will run
- Download the code of your newly created bot, and copy
appsettings.json file from it into the PeopleBlenderBot you are devoping. This file contains App Id and App Password that are required to securely connect to bot connector. - From Visual Studio, right-click on your
PeopleBlenderBot project and select Publish. The select the existing Web App created during step 1, and deploy your code there.
Once the bot has been deployed to the cloud, you can make sure that it works by testing it in the web chat: 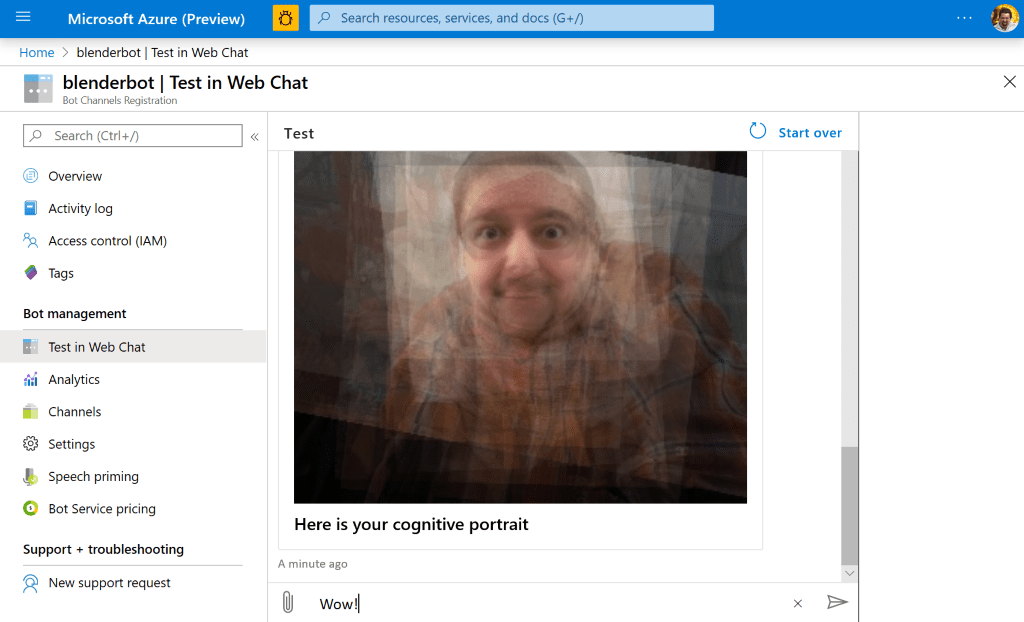
Making the bot work in Telegram is now a matter of configuring the channel, which is described in detail in the Docs:
Conclusion
I have shared my own experience of creating an interactive exhibit with its logic in the cloud. I encourage you to use this approach if you are doing some work with museums and exhibitions, and if not - just to explore the direction of science art, because it is a lot of fun! You can start by playing with Cognitive Portrait Techniques Repository, and then move on! In my other blog post I discuss AI and Art, and show the examples where AI becomes even more creative. Feel free to get in touch if you want to talk more about the topic, or collaborate!
The bot I have created is currently available in Telegram as @peopleblenderbot and in my local virtual museum, and you can try it our yourself. Remember, that you are not only chatting with the bot, you are enjoying virtual art exhibit that brings people together, and that your photos will be stored in the cloud and sent to other people in blended form. Look forward for more news on when this exhibit will be available in museums!
Credits
In this post, especially for creating drawings, I used some Creative Commons content here, here, here, here. All the work of original authors is greatly appreciated!