On the other hand, you have probably heard of Azure Machine Learning — a special platform service for doing ML. However, if you start looking at some getting started tutorials, you will have the impression that using Azure ML creates a lot of unnecessary overhead, and the process is not ideal. For example, the training script in the example above is created as a text file in one Jupyter cell, without code completion, or any convenient ways of executing it locally or debugging. This extra overhead was the reason we did not use it as much in our projects.
However, I recently found out that there is a Visual Studio Code Extension for Azure ML. With this extension, you can develop your training code right in the VS Code, run it locally, and then submit the same code to be trained on a cluster with just a few clicks of a button. By doing so, you achieve several important benefits:
- You can spend most of the time locally on your machine, and use powerful GPU resources only for training. The training cluster can be automatically resized on demand, and by setting the min amount of machines to 0 you can spin up the VM on demand.
- You keep all results of your training, including metrics and created models, in one central location — no need to keep the record of your accuracy for each experiment manually.
- If several people work on the same project — they can use the same cluster (all experiments will be queued), and they can view each other’s experiment result. For example, you can use Azure ML in a classroom environment, and instead of giving each student an individual GPU machine you can create one cluster that will serve everyone, and foster the competition between students on model accuracy.
- If you need to perform many trainings, for example for hyperparameter optimization — all that can be done with just few commands, no need to run series of experiments manually.
I hope you are convinced to try Azure ML yourself! Here is the best way to start:
Azure ML Workspace and Portal
Everything in Azure ML is organized around a Workspace. It is a central point where you submit your experiments, store your data and resulting models. There is also a special Azure ML Portal that provides web interface for your workspace, and from there you can perform a lot of operations, monitor your experiments and metrics, and so on.
You can either create a workspace through Azure Portal web interface (see step-by-step instructions), or using Azure CLI (instructions):
az extension add -n azure-cli-ml
az group create -n myazml -l northeurope
az ml workspace create -w myworkspace -g myazml
Workspace contains some Compute resources. Once you have a training script, you can submit experiment to the workspace, and specify compute target — it will make sure the experiment runs there, and stores all the results of the experiment in the workspace for future reference.
MNIST Training Script
In our example, we will show how to solve very traditional problem of handwritten digit recognition using MNIST dataset. In the same manner you will be able to run any other training scripts yourself.
Our sample repository contains simple MNIST training script train_local.py. This script downloads MNIST dataset from OpenML, and then uses SKLearn LogisticRegression to train the model and print the resulting accuracy:
mnist = fetch_openml('mnist_784')
mnist['target'] = np.array([int(x) for x in mnist['target']])

shuffle_index = np.random.permutation(len(mist['data']))
X, y = mnist['data'][shuffle_index], mnist['target'][shuffle_index]

X_train, X_test, y_train, y_test =
  train_test_split(X, y, test_size = 0.3, random_state = 42)

lr = LogisticRegression()
lr.fit(X_train, y_train)
y_hat = lr.predict(X_test)
acc = np.average(np.int32(y_hat == y_test))

print('Overall accuracy:', acc)
Of course, we are using Logistic Regression just as illustration, not implying that it is a good way to solve the problem…
Running the Script in Azure ML
You can just run this script locally and see the result. If we chose to use Azure ML, however, it will give us two major benefits:
- Scheduling and running training on a centralized compute resource, which is typically more powerful than a local computer. Azure ML will take care of packaging our script into a docker container with appropriate configuration
- Logging the results of training into a centralized location inside Azure ML Workspace. To do so, we need to add the following lines of code to our script, to record the metrics:
from azureml.core.run import Run
...
try:
    run = Run.get_submitted_run()
    run.log('accuracy', acc)
except:
    pass
Modified version of our script is called train_universal.py (it is just a bit more complicated than the code presented above), and it can be run both locally (without Azure ML), and on remote compute resource.
To run it on Azure ML from VS Code, follow those steps:
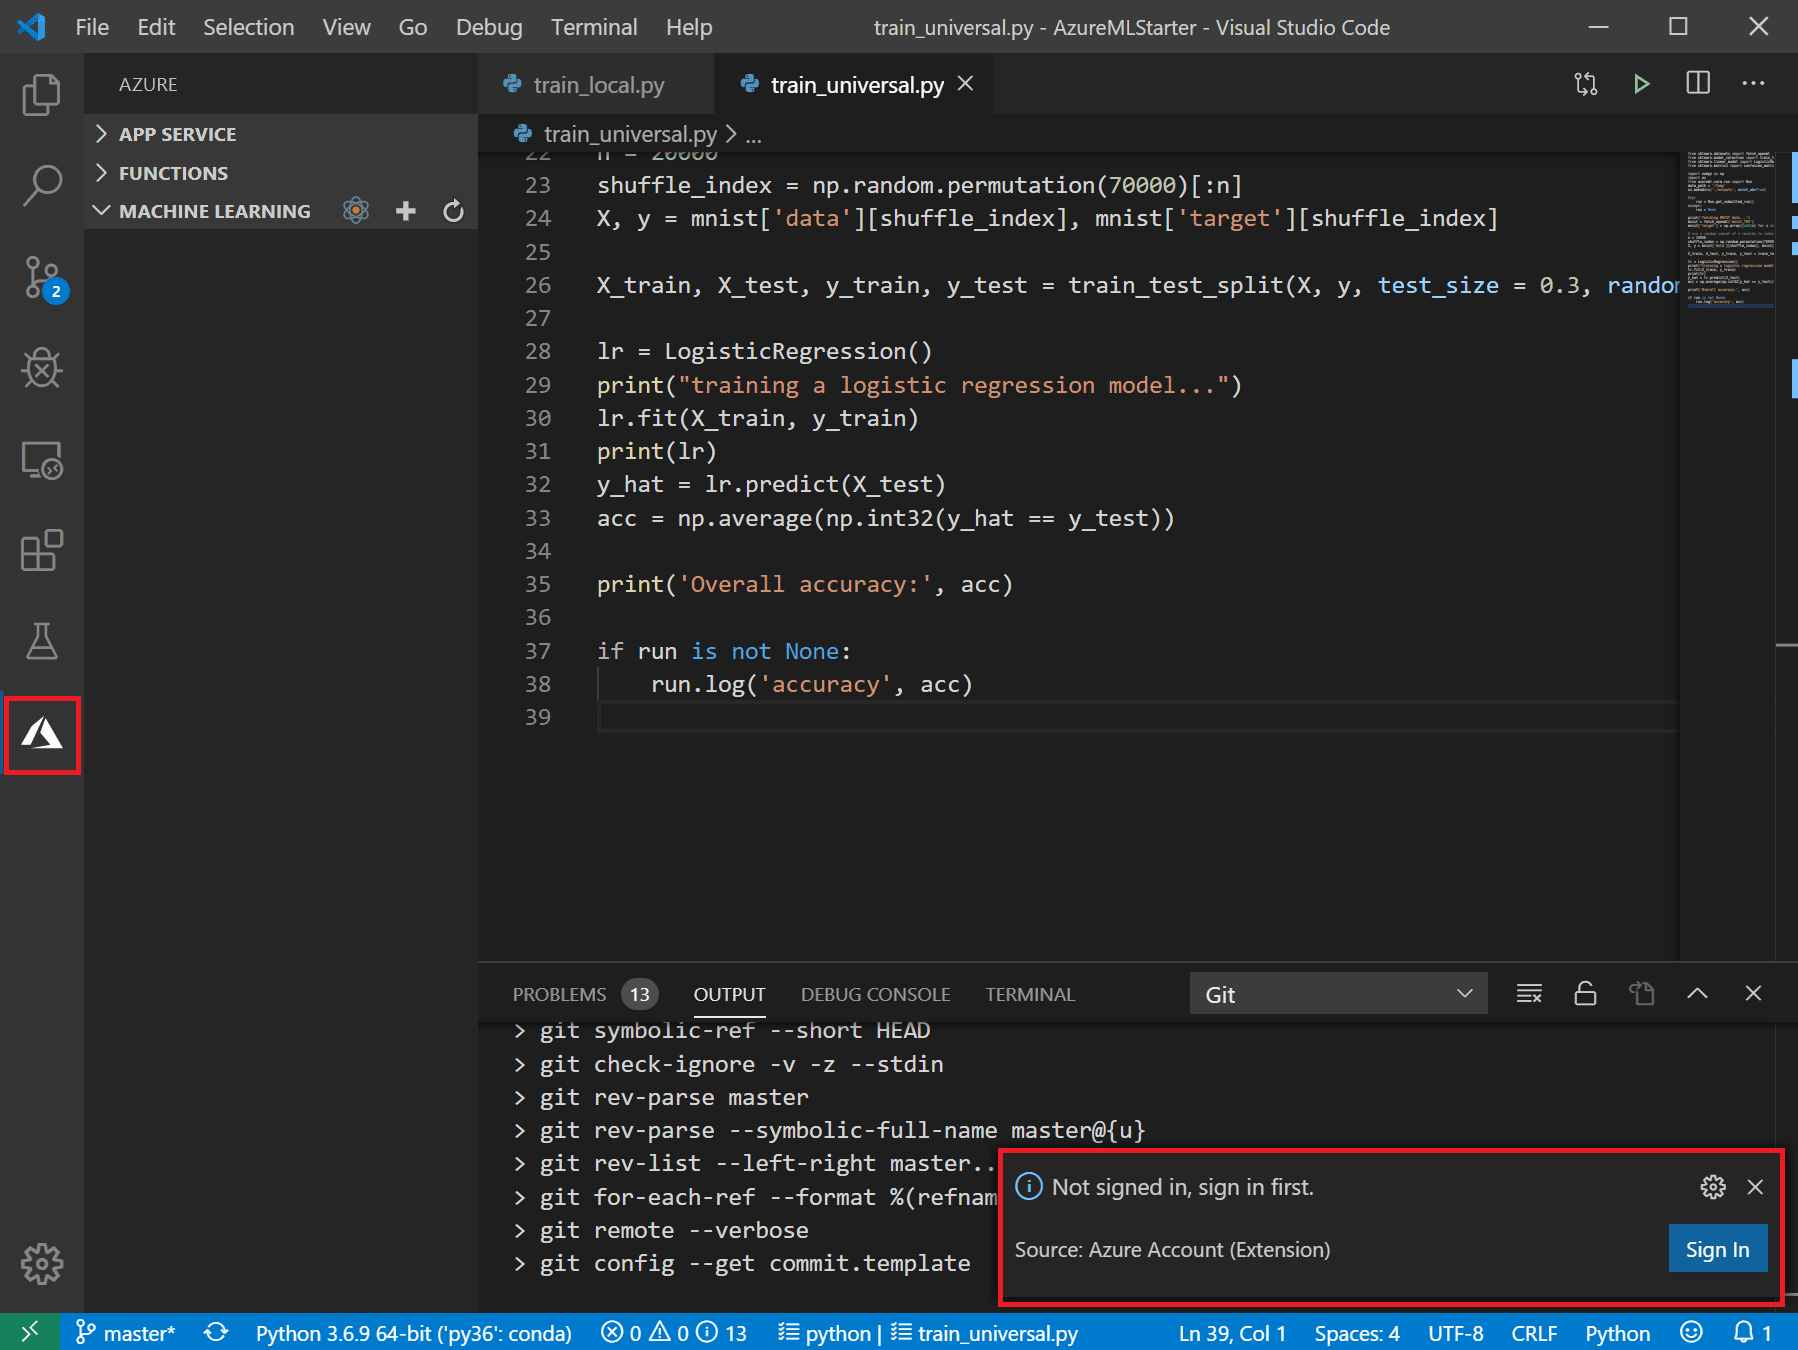
Make sure your Azure Extension is connected to your cloud account. Select Azure icon in the left menu. If you are not connected, you will see a notification on the right bottom offering you to connect (see picture). Click on it, and sign in through browser. You can also press Ctrl-Shift-P to bring up command palette, and type in Azure Sign In.
After that, you should be able to see your workspace in the MACHINE LEARNING section of Azure bar: 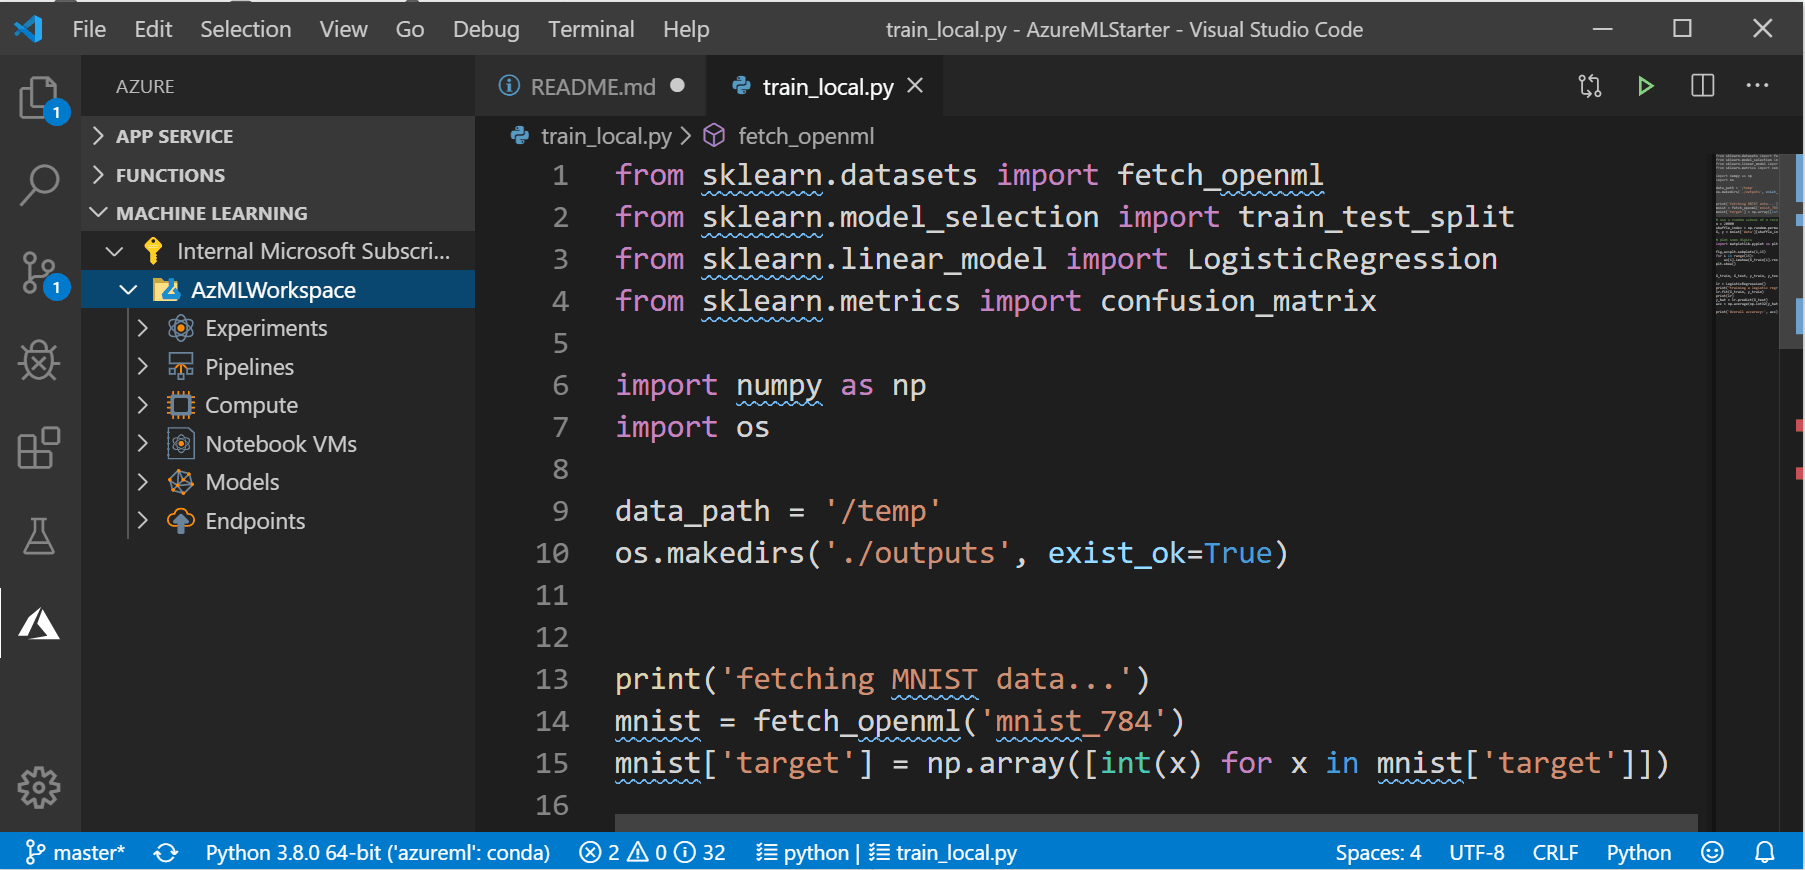 Here you should see different objects inside your workspace: compute resources, experiments, etc.
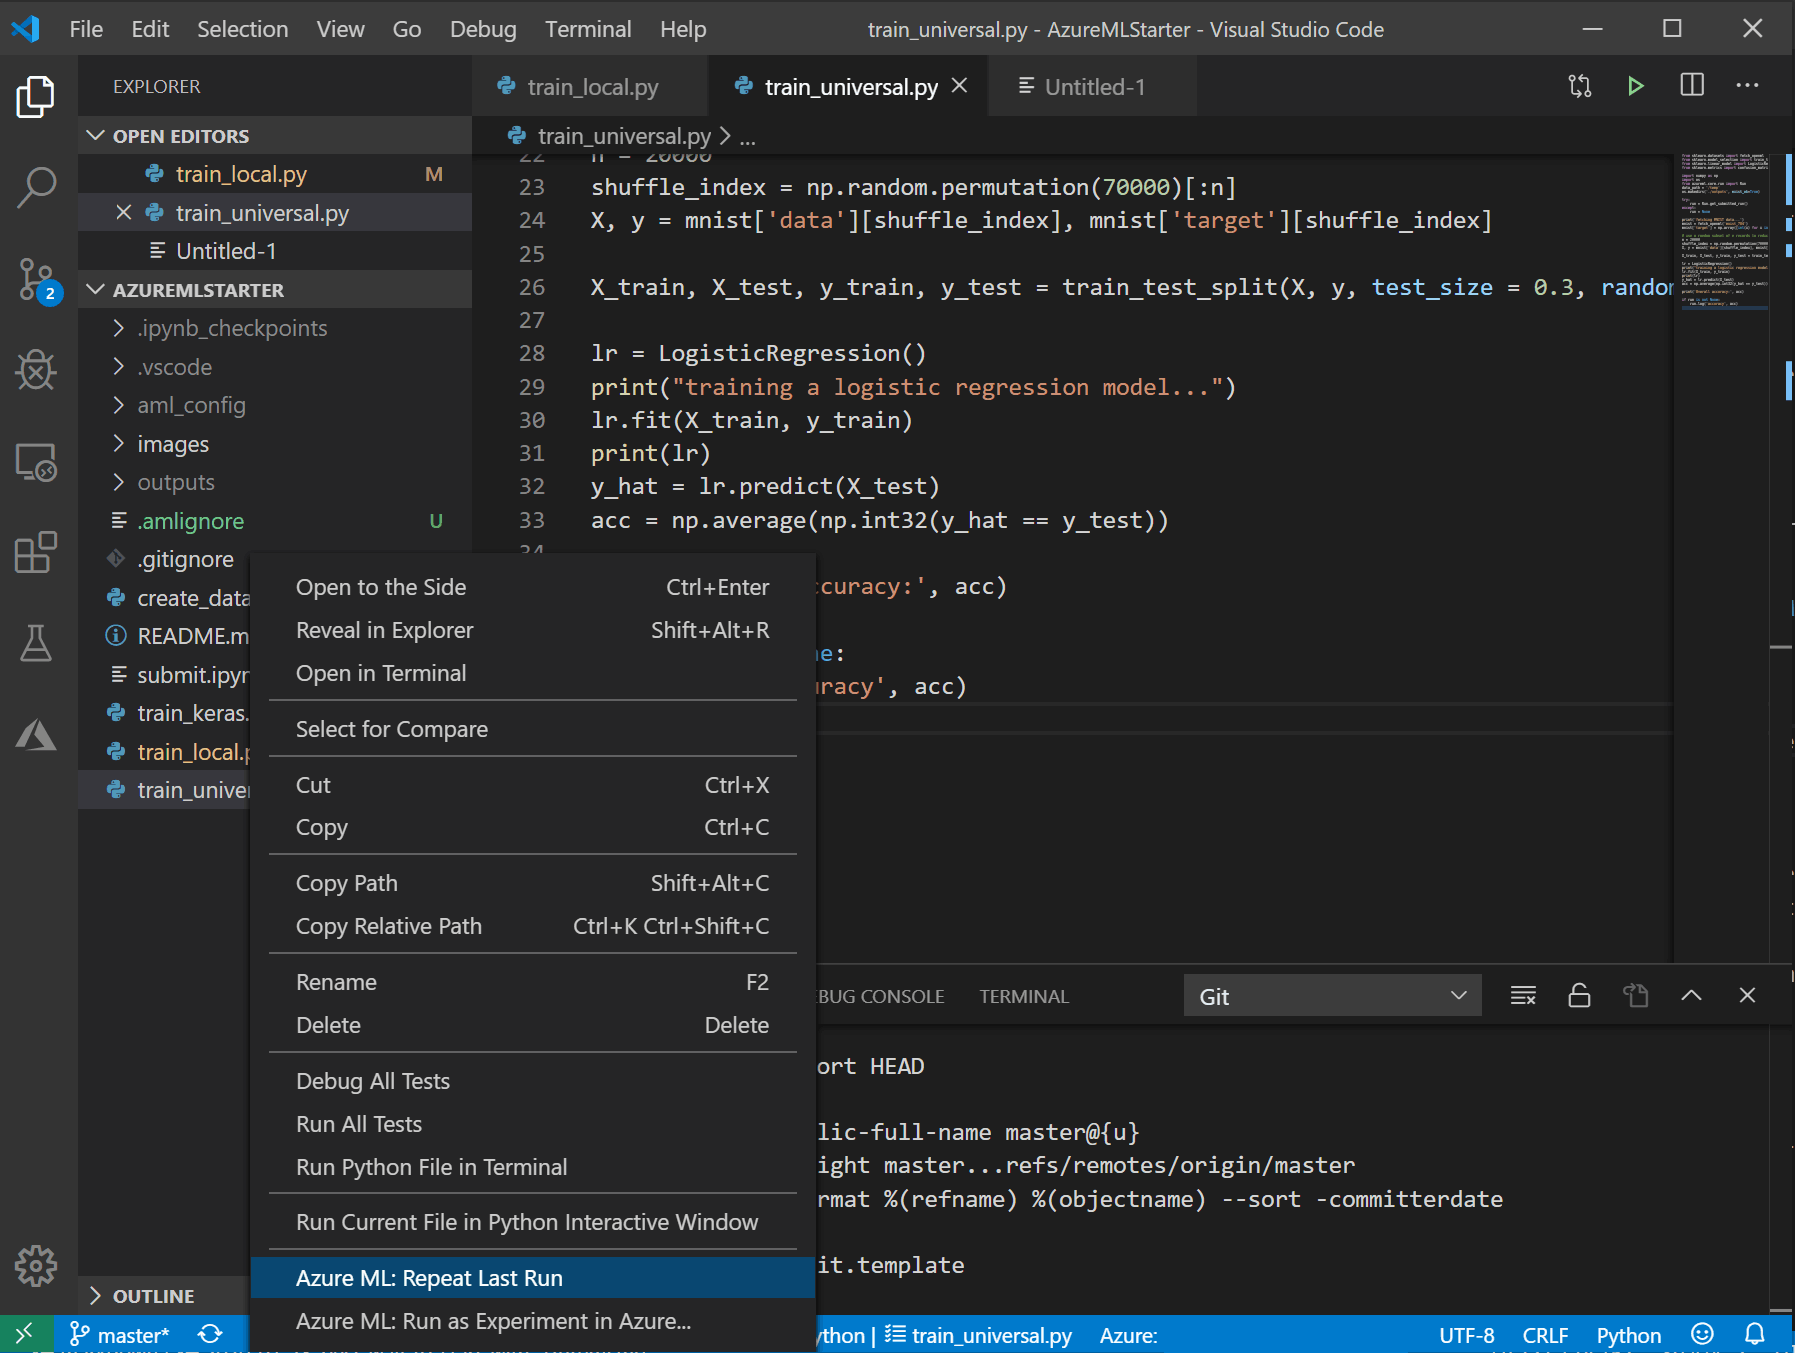
Go back to the list of files, and right-click on train_universal.py and select Azure ML: Run as experiment in Azure. 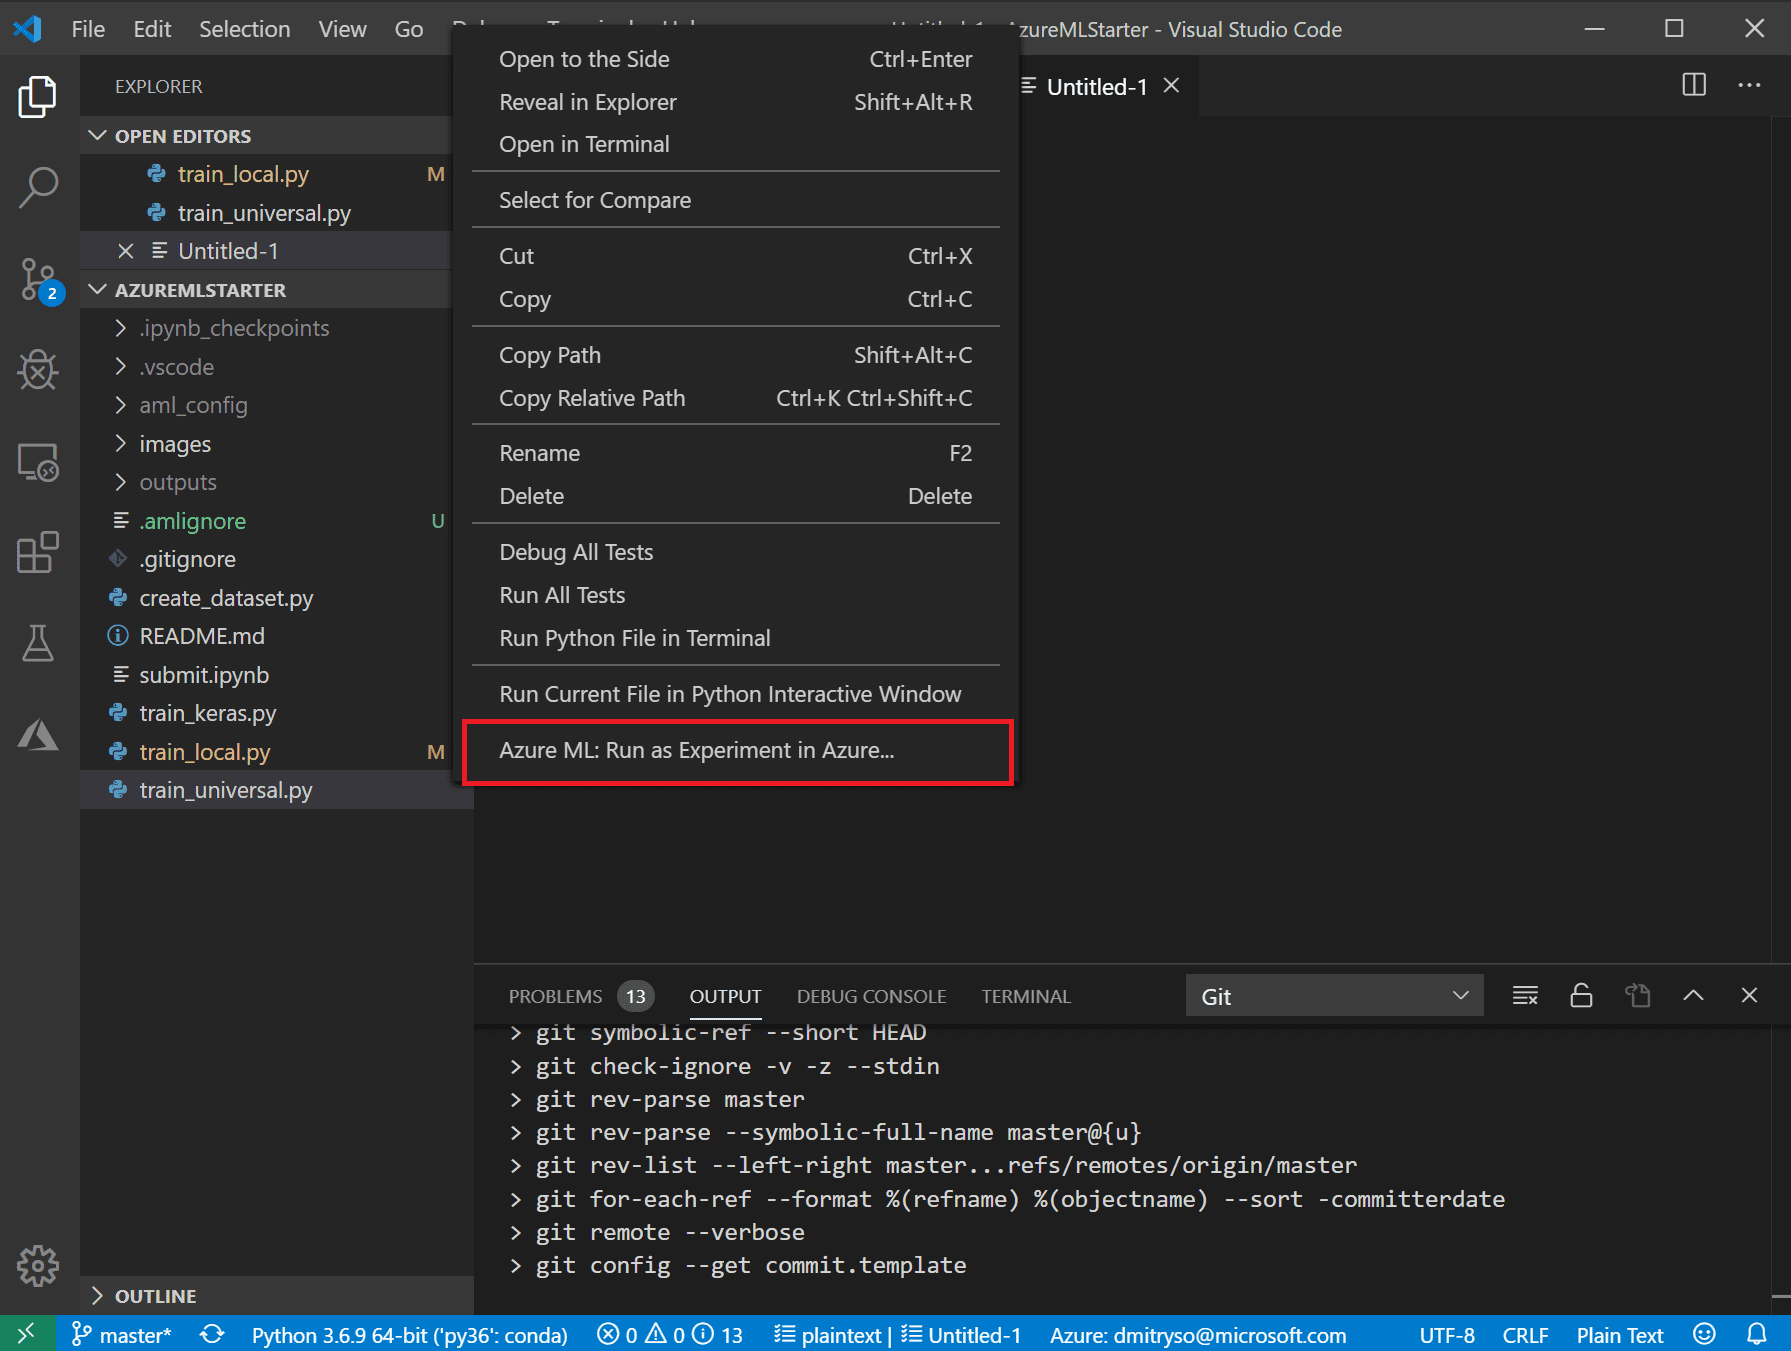
Confirm your Azure subscription and you workspace, and then select Create new experiment: 


- Create new Compute and compute configuration:
- Compute defines a computing resource which is used for training/inference. You can use your local machine, or any cloud resources. In our case, we will use AmlCompute cluster. Please create a scalable cluster of STANDARD_DS3_v2 machines, with min=0 and max=4 nodes. You can do that either from VS Code interface, or from ML Portal.

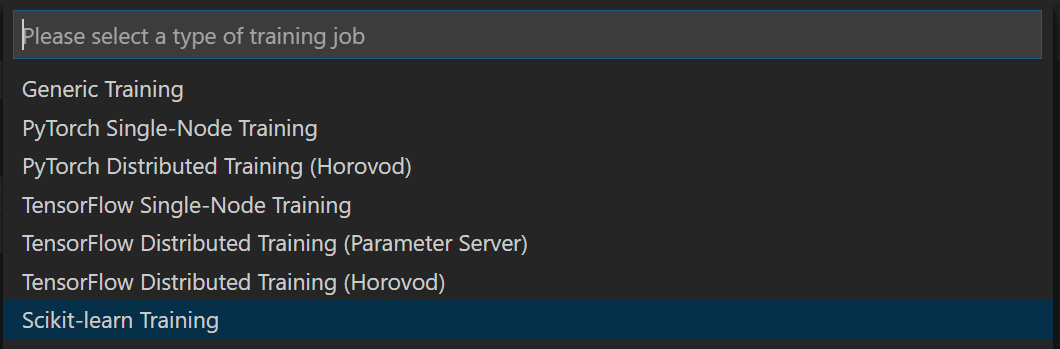
- Compute Configuration defines the options for containers which are created to perform training on a remote resource. In particular, it specifies all libraries that should be installed. In our case, select SkLearn, and confirm the list of libraries.

You will then see a window with JSON description of the next experiment. You can edit the information there, for example change the experiment or cluster name, and tweak some parameters. When you are ready, click on Submit Experiment: 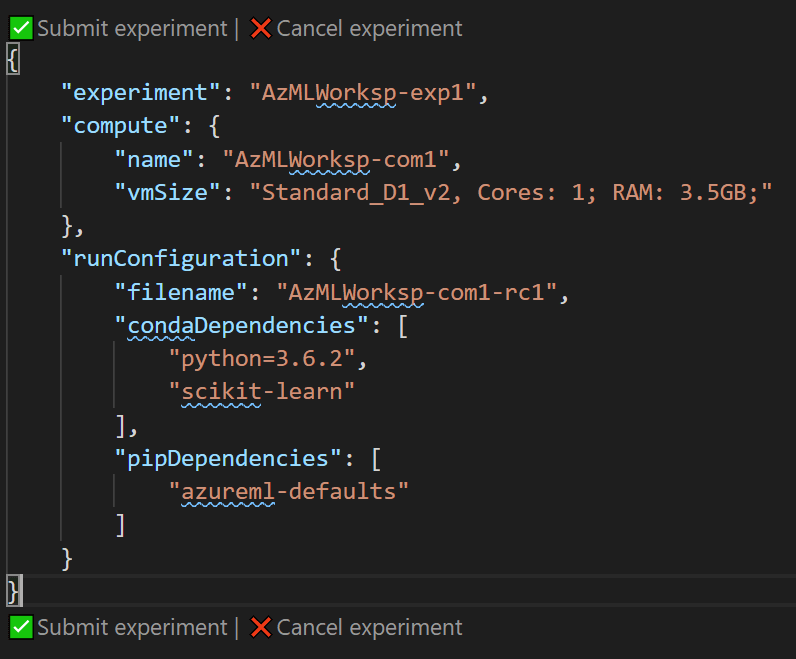
After the experiment has been successfully submitted in VS Code, you will get the link to the Azure ML Portal page with experiment progress and results. 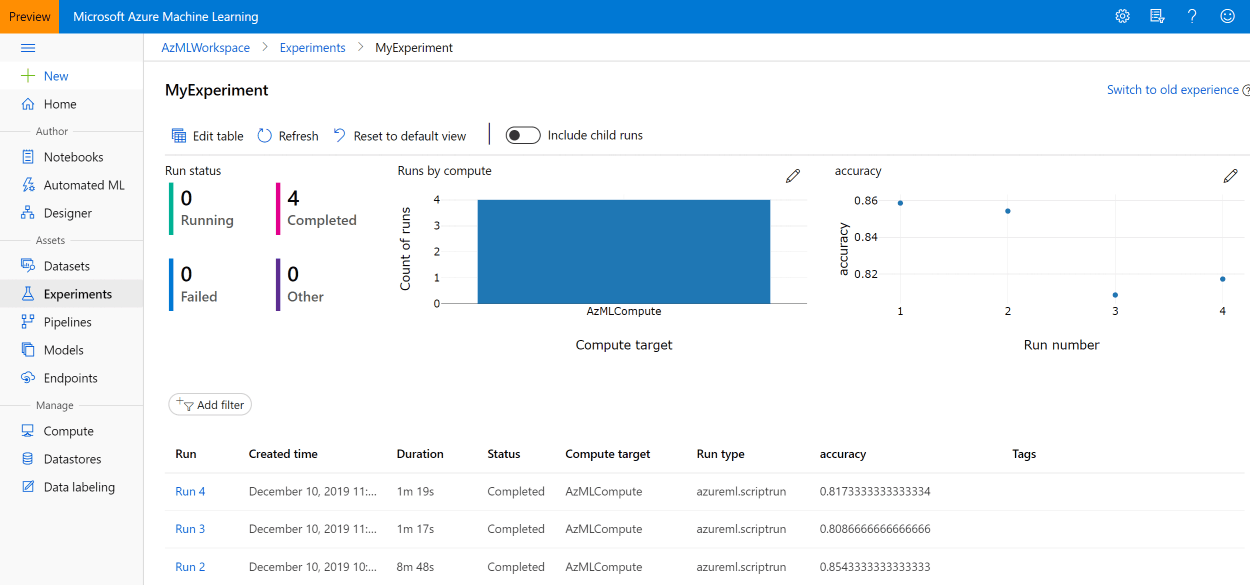 You can also find your experiment from Experiments tab in Azure ML Portal, or from Azure Machine Learning bar in VS Code:
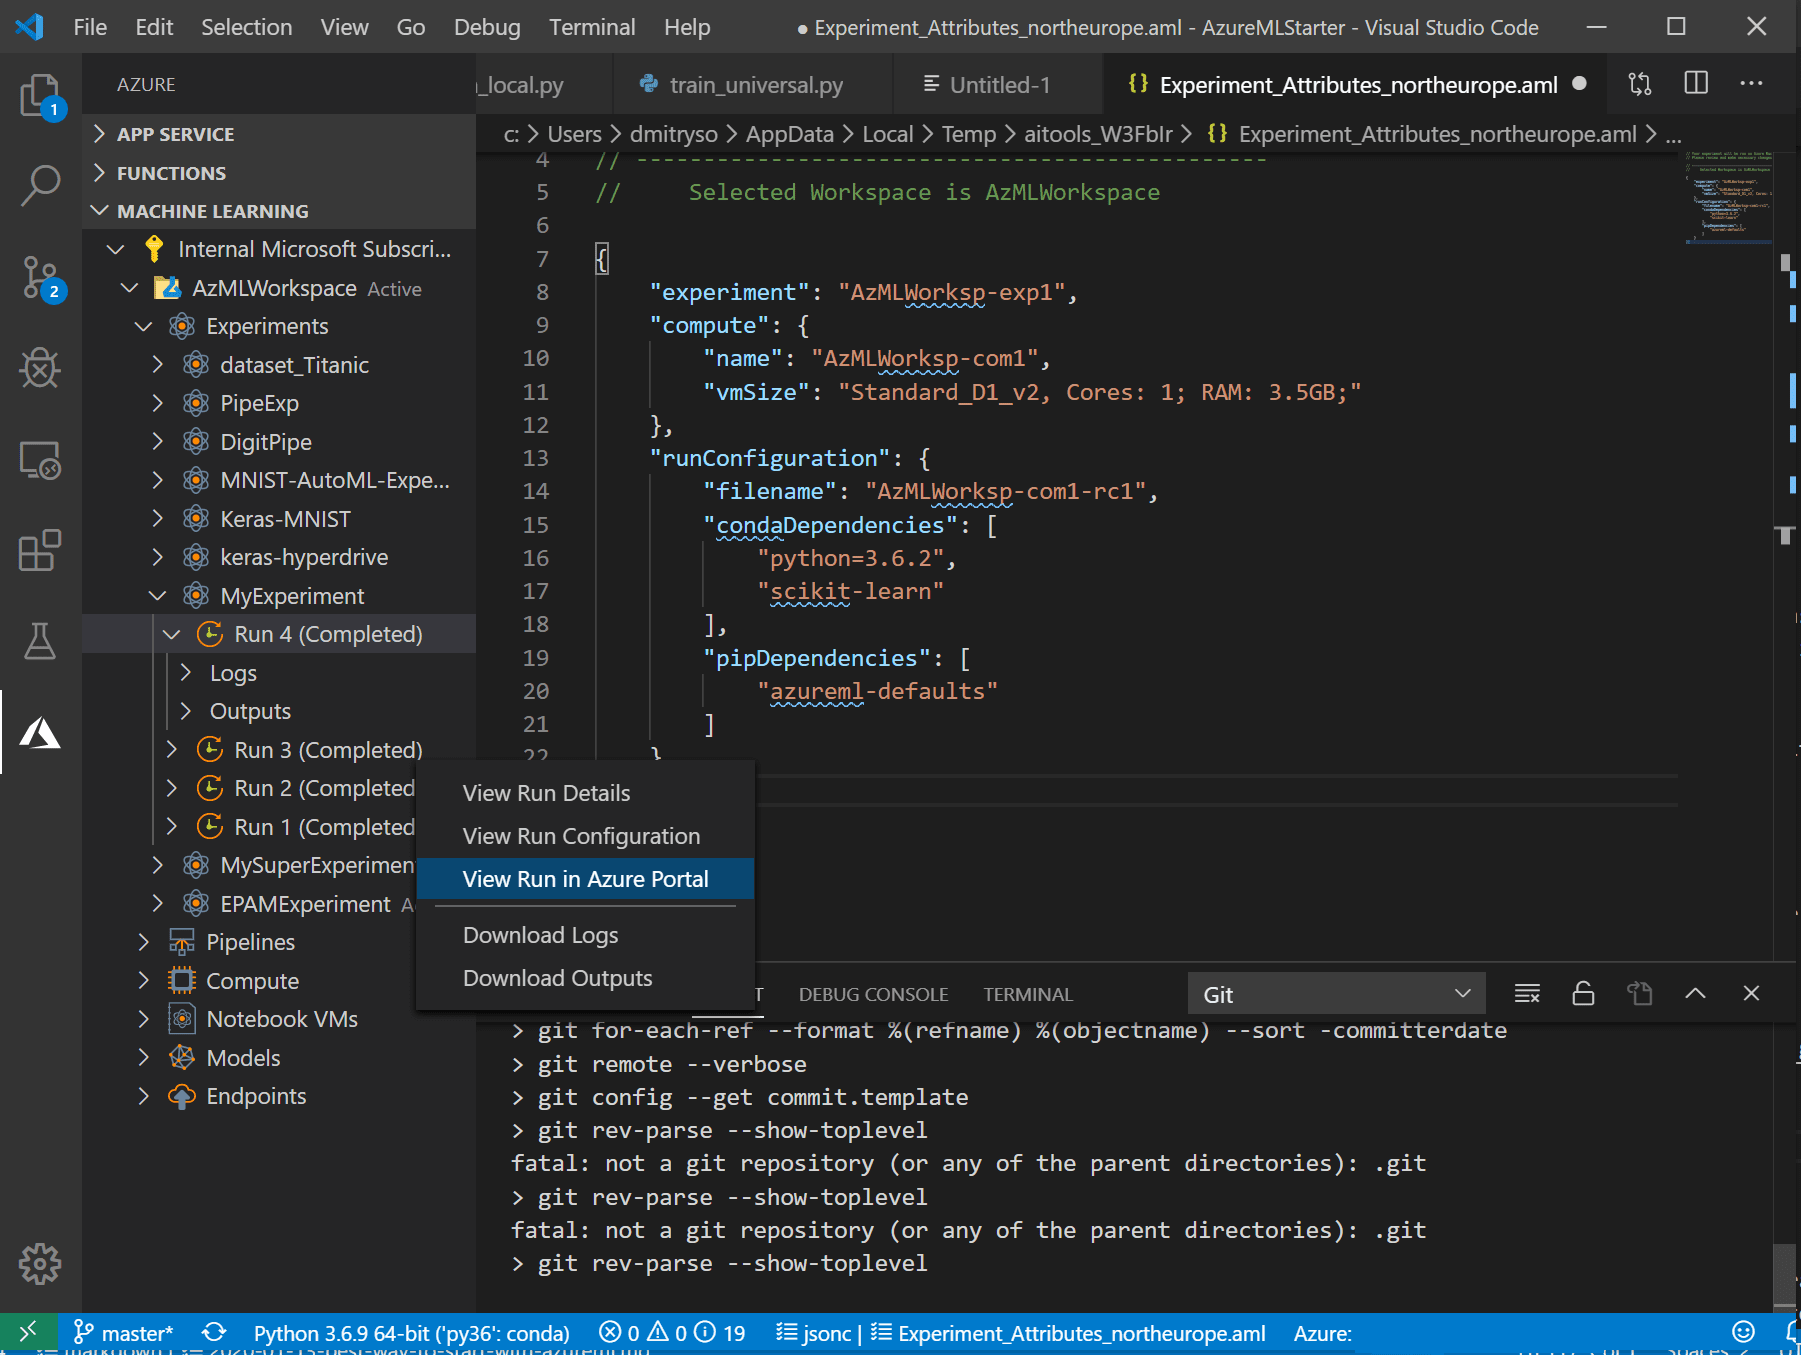
- If you want to run the experiment again after adjusting some parameters in your code, this process would be much faster and easier. When you right-click your training file, you will see a new menu option Repeat last run — just select it, and the experiment will be submitted right away.
 You will then see the metric results from all runs on Azure ML Portal, as in the screenshot above.
Now you know that submitting runs to Azure ML is not complicated, and you get some goodies (like storing all statistics from your runs, models, etc.) for free.
You may have noticed that in our case the time it takes for the script to run on the cluster is more than running locally — it may even take several minutes. Of course, there is some overhead in packaging the script and all environment in a container, and sending it to the cloud. If the cluster is set to automatically scale down to 0 nodes — there might be some additional overhead due to VM startup, and all that is noticeable when you have a small sample script that otherwise takes a few seconds to execute. However, in real life scenarios, when training takes tens of minutes and sometimes much more — this overhead becomes barely important, especially given the speed improvements you can expect to get from the cluster.
What’s Next?
Now that you know how to submit any scripts for execution on a remote cluster, you can start taking advantage of Azure ML in your daily work. It will allow you to develop scripts on a normal PC, and then schedule it for execution on GPU VM or cluster automatically, keeping all the results in one place.
However, there are more advantages from using Azure ML than just those two. Azure ML can also be used for data storage and dataset handling — making it super-easy for different training scripts to access the same data. Also, you can submit experiments automatically through the API, varying the parameters — and thus performing some hyperparameter optimization. Moreover, there is a specific technology built into Azure ML called Hyperdrive, which does more clever hyperparameter search. I will talk more about those features and technologies in my next posts.
Useful Resources
You may find the following courses from Microsoft Learn useful, in case you want to know more:
Other Posts in Azure ML Series