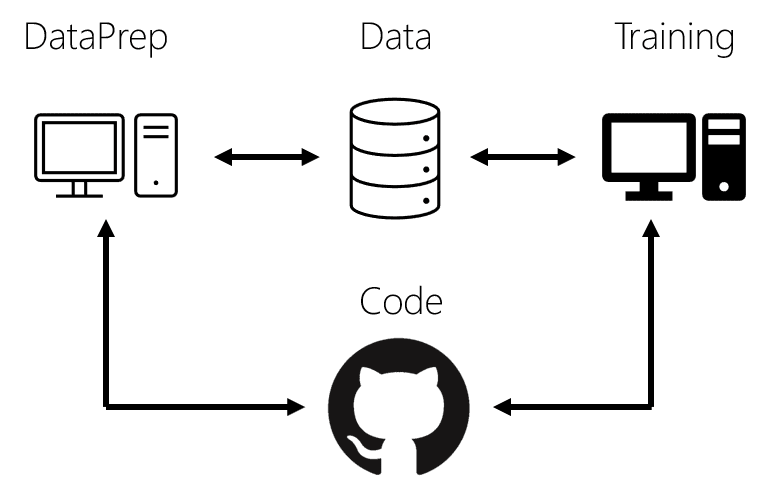
Creating two virtual machines instead of one is in fact not problematic, because a Data Science Virtual Machine (DSVM) comes with everything pre-installed, so you likely will not need a lot of configuration. You can in fact create both of them using simple Azure CLI commands like this:
az vm create
   --resource-group ds --name dataprep
   --image microsoft-dsvm:ubuntu-1804:1804:20.07.06
   --admin-username vmuser --admin-password myp@ssw0rd2020
   --size Standard_D3v2
   --public-ip-address-dns-name dataprep
   --generate-ssh-keys
For the second machine, make sure to change the --name (and --public-ip-address-dns-name), and specify --size as Standard_NC6 (or any other type with GPU).
However, the would be an important issue about sharing the data (and, possibly, code) between the two. Let me outline different possible approaches below.
Using Local SSD + AzCopy
In most of the cases, data for training would be available somewhere in Azure, for example in Blob Storage, or in a database. The simplest idea would be to copy this data to each of the Virtual Machines, and use it locally. No secret is that local filesystem, especially SSD, provides best access speed.
Standard DSVM configuration provides out-of-the-box temporary SSD mounted in /mnt, and it is convenient to use it. However, keep in mind that this SSD is removed each time VM is stopped/restarted, so if you prefer transient storage - you can manually attach another SSD storage to it.
To copy dataset to two VMs, you can use great AzCopy utility, which is very fast way to copy large amounts of data in Azure between different sources. For example, to get the content of a blob storage to a local directory, use:
azcopy
  --source https://<storage_acct>.core.windows.net/data
  --source-key ==connection key==
  --destination /mnt/data
This approach has two main disadvantages:
- it results in data duplication (so you may end up paying for storing your data twice)
- if you modify or transform data in some way - you need to manually copy the changes back to storage
Using Azure Files
Azure Files is a type of basic Azure Storage that allows you to create a SMB-mountable directory. This directory can be simultaneously mounted to two several machines, including both VMs, and, possibly, workstations that you are using. SMB shares can also be used on Windows machines, which is great in case you are like me and prefer to use Windows on your laptop.
The easiest way to set up the file share is through Azure Portal. You can then copy the command to mount the share from the Connect section, and paste it in the terminal: 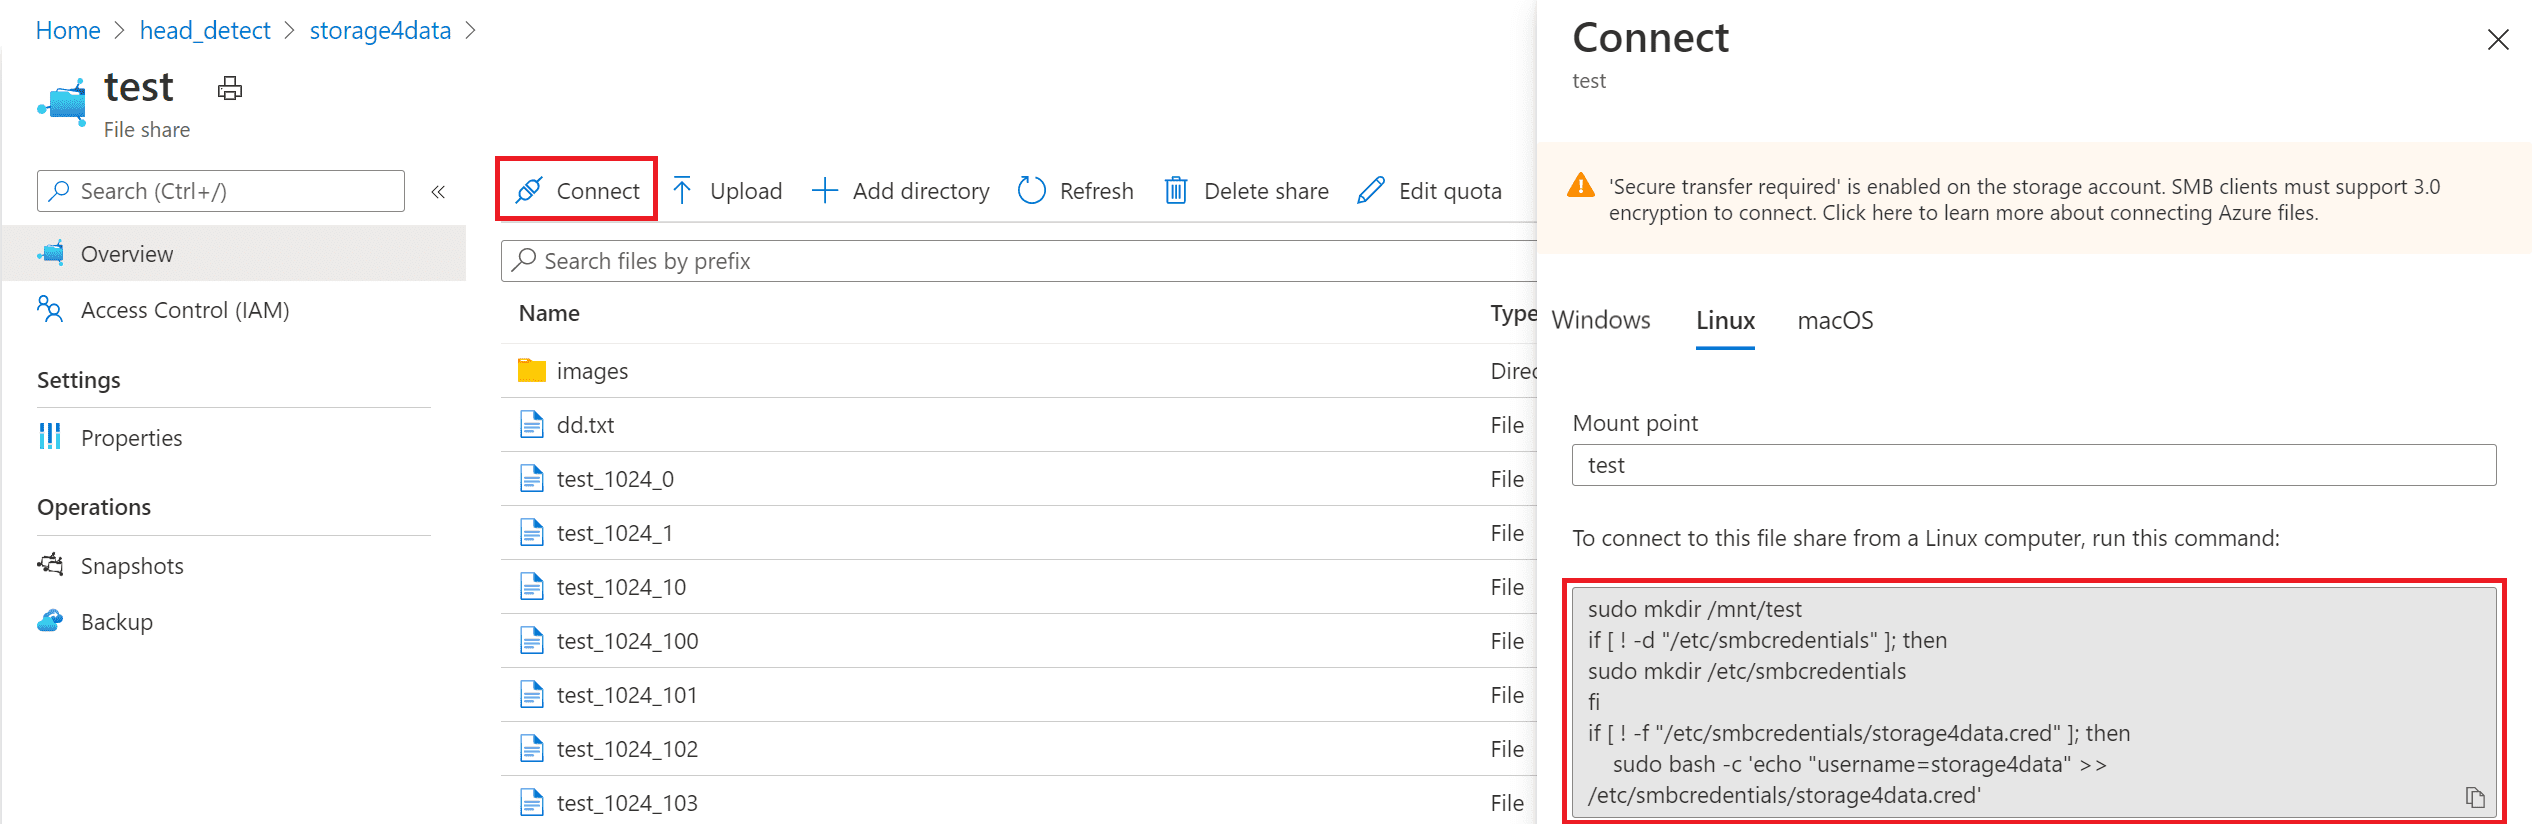 You can also create file share and mount it using Azure CLI commands.
While this may sound like an ideal solution, this approach results in slower access speed comparing to other methods, especially in the case of many small files.
Storing Data on Virtual Hard Disk
Virtual Machines in Azure support mounting additional Virtual Hard Disks. By having your data available on a separate disk you can keep the costs low, and also manage between price/performance by choosing appropriate storage option (SSD vs. HDD).
The main drawback is that a normal virtual disk can only be mounted to one VM at a time. There is also a new feature called [shared virtual disks][ShareVHD] which allows attaching a VHD to two (or sometimes even more) VMs, but it is only available for Premium SSD, and for some VM types. Thus a setup that uses shared VHD becomes rather expensive.
The working solution would be to attach disk to the machine that you are currently using. However, this would require either a lot of manual operations or some rather complicated scripting, involving az vm disk attach, as well as mount/’umount-ing disk within OS. It might be somehow okay for data preparation / training scenario, but it will definitely not work if you want to do parallel training or processing.
Mounting Blog Storage using BlobFuse Driver
Finally, you can mount Blob Storage directly to the VM using Blobfuse Driver, which exposes contents of your blob storage as a filesystem directory on both of your machines. This approach seems to be one of the best ones, because Blobfuse driver is clever enough to cache files locally, yet download only those files that are actually accessed. It will also work in the case you have several VMs, and want to organize parallel training or parallel processing, because you can distribute files between several processing nodes, and it will not cause the whole dataset to be downloaded by each of the nodes – only the appropriate part.
IMPORTANT: Blobfuse driver performs local caching of files, both for reading and for writing. Thus, if you change the contents of the disk on one machine, it will not be immediately reflected on the other - depending on the caching timeout settings specified during mounting. In general, blobfuse setup is recommended for the situations where data is rarely updated, or only new data is added. After you have made modification to the data on dataprep machine, it is recommended to re-mount the drive on another machine to make sure all changes are reflected.
To compare the performance of different approaches, I have made a few tests using this Python script to read/write a series of binary files to disk. Because access time depends on the file size, I have made experiments with 1K files (which correspond to some small text/json files), 1M files (which correspond to typical images used in deep learning), and also with larger files us to 100M. Here are the results:
| Type | Local/Mounted SSD | Mounted Share | Blob Fuse | AzCopy Blob |
|---|
| 1k Write | 28.9 | 0.02 | 0.09 | |
| 1k Read | 60 | 0.06 | 0.08 | |
| 1M Write | 1116 | 13.7 | 34.5 | |
| 1M Read | 3170 | 22.7 | 27.24 | |
| 10M Write | 873 | 62.8 | 61.4 | |
| 10M Read | 2154 | 50.6 | 71.56 | |
| 100M Write | 173 | 71.4 | 82.5 | |
| 100M Read | 1150 | 54.2 | 136.8 | |
| HollywoodHeads Dataset | | | | |
| ~1K Read (Annotations) | 10 | 0.03 | 0.02 | 0.53 |
| ~25K Read (Images) | 211 | 0.98 | 0.54/1.4 | 20.1 |
| ~1K Write (Annotations) | | 0.07 | 0.322 | 0.29 |
| ~25K Write (Images) | | 0.88 | 1.9 | 9.6 |
I have also made real-life tests with HollywoodHeads dataset for head object detection, which contains both annotations (small ~1K text files) and images (~25K).
You can see from this table that local file storage definitely offers huge performance advantage. Blobfuse is marginally superior to Azure File share.
Conclusions on Data Sharing
From this comparison, recommendation on sharing data between two VMs are the following:
- In most of the cases, you will use Azure Blob storage to store your original datasets. However, there are cases when you may prefer Azure File Share, or have the original data somewhere in the database.
- If you are planning to perform heavy training with many epochs, you will benefit by storing the data locally on the SSD. To copy the data over from blob storage, use AzCopy utility. Depending on your scenario, use temporary SSD, or create and attach a permanent one.
- If you rarely switch between dataprep and training, you can use one SSD which is attached to one machine at a time.
- In most of the cases, using blobfuse storage driver to attach your original blob storage with a dataset to both VMs would be the best option.
All the problems I have described here are already solved in the best possible way in Azure Machine Learning. In Azure ML, compute is logically separated from storage, so you can seamlessly attach your Jupyter Notebooks to different compute options, and also schedule your training scripts to be run on different compute engines on the same data. If you can afford some learning curve – differently the best solution would be to switch to Azure ML!
Sharing the Code
When working with data, you would also end up writing some code, both to do data processing and actual training. While you can use the same techniques I described here to share code, my recommendation is to use git (and GitHub) to do code sharing, or some other source code control solution. In addition to code sharing, it will offer you many advantages, such as changes tracking, collaborative development, etc.
Setting up Dual-VM Configuration with Blobfuse
Below are some instructions to create dual VM setup described above based on blobfuse driver. I assume you have create two VMs described above, and blob storage for the data in the same region and resource group:
az storage account create -l northeurope -n storage4data -g ds --sku Standard_LRS
Now we will need to mount the storage as a directory on both your virtual machines. SSH to the first one of them.
To install blobfuse driver, you need to do the following (the process is described here in more detail, also for other operating systems):
wget https://packages.microsoft.com/config/ubuntu/18.04/packages-microsoft-prod.deb
sudo dpkg -i packages-microsoft-prod.deb
rm packages-microsoft-prod.deb
sudo apt-get update
sudo apt-get install blobfuse
To mount the directory, we need to specify configuration details in the config file. We will hold all fuse-related files in fuse directory:
mkdir ~/fuse
cat > ~/fuse/fuseconfig.txt
accountName storage4data
accountKey ...
containerName data
EOF
chmod 600 ~/fuse/fuseconfig.txt
You can get storage account key from Azure Portal, or using the following:
az storage account keys list --account-name storage4data -g ds
We will now create a script file called fusemount to mount data directory using fuse driver. You can also type the commands directly, but having a script is more convenient, because it would be easier to perform those steps each time you restart the machine, and need to mount again.
Fuse uses some local cache directory to store files. You can create a ramdisk for faster access (more details on this here), or use any fast local disk, such as SSD. In our case, we will use /mnt/cache as the caching directory, and /mnt/data as mount point. We will add commands to create those directories in the beginning of mount script. In DSVM, /mnt directory is not preserved, so after machine restart you would have to re-create directories and do re-mount, and having just one script to do all that is helpful:
cat > ~/fuse/fusemount
#!/bin/bash
sudo mkdir /mnt/data /mnt/cache
sudo chown vmuser /mnt/data /mnt/cache
sudo blobfuse /mnt/data --tmp-path=/mnt/cache --config-file=/home/vmuser/fuse/fuseconfig.txt -o attr_timeout=240 -o entry_timeout=240 -o negative_timeout=120
EOF
Final command here is the actual mounting command. Apart from path to caching directory and to fuse configuration file, it specifies some additional options, such as timeouts. If you want to make sure you are always getting the latest version of files from blob storage, you can specify --file-cache-timeout-in-seconds=0.
Finally, make the file executable and run it:
chmod u+x ~/fuse/fusemount
~/fuse/fusemount
Now, you can use /mnt/data as your dataset directory. Either put your dataset there using command-line, or you can use AzCopy to bring the data from anywhere else (including other clouds) directly to the blob storage, and it would be reflected automatically in your filesystem.
Finally, you need to perform all those steps on the second machine. Repeat apt-get installation steps, and then copy fuse directory over from the first machine, because you have everything already in place:
scp -R vmuser@dataprep.northeurope.cloudapp.azure.com:~/fuse .
~/fuse/fusemount
(this command assumes you have set up dataprep VM first)
You have a complete setup ready to go! To see how it can be used for training object detection on HollywoodHeads dataset using Retinanet, read my next blog post!