Since data scientist became such a popular profession, I am sure many people started thinking of learning data science, and many of them were discouraged because they thought one needs to be a good programmer. Most of the people think that knowing machine learning starts from Python. However, I must assure you that this is not the case! There are some basic principles of data science that you need to learn before learning Python, and you can start solving many real world problems without any coding at all!
The most important thing about data science is to start thinking about problems in terms of data, features, accuracy measurements, etc. It is less important whether you train the model through writing Python programs or via some other tools.
Let’s consider an example: suppose you want to understand which photographs are better for social media. For example, does it make sense to insert a photograph of a kitten into a blog post to attract attention, or the audience is tired of those cheesy photographs? What does it take to get high number of likes for a photograph in social media?
For people who want to start learning Data Science without deep programming skills, Microsoft and Udacity have just announced Machine Learning Scholarship Program for Microsoft Azure. You can apply for the program before July 30, 2020.
Let’s see how we can approach the problem from a data science perspective.
Thinking like a Data Scientist
Data science relies on data. So the first thing we need to do is to collect the dataset. In our case, we have an objective measure of how much the audience likes some content, and that is the number of likes.
Getting the Dataset
There are multiple things that can affect the number of likes: the image itself, corresponding text, or the date and time of publication. Let’s for focus on images only, and take a sample of images from Instagram, together with corresponding number of likes. So our initial dataset would consist of a photograph (URL) and a number of likes it has received.
Once we have the data, we need to figure out which problem we will be solving. There is a number of typical problems that machine learning can handle, the most important ones being:
- Classification problem, when we need to categorize our objects into two or more classes. An example of classification problem would be filtering e-mail spam, because we need to classify each e-mail into either spam or not-spam.
- In Regression problem, we need to predict a number. Predicting the amount of ice-cream sold on each specific day in a shop would be a good example.
- Clustering problem can help us find similar types of objects and group them together based on some similarity principle.
- Anomaly detection allows us to find data which differs from “normal”
In our case, we have a regression problem, because we are looking to build a model that predicts number of likes our photograph will receive.
Traditional machine learning models work with tabular data, where each data point is represented by a row in a table that consist of features (input values for the model) and label (the value we are trying to predict). While more advanced neural network models can work with images directly, they require much more data to train, so we will not discuss them here.
To train the model we first need to perform featurization, i.e. extract numerical or categorical features from the picture. We can use Cognitive Services Computer Vision API to do that. Cognitive services can take a picture as input, and then return everything that computer can “see” in this picture: information about people, objects, dominant color, and any text that is present on the picture. For example, we can extract the following features:
- main image category: food, portrait, building, landscale, etc.
- number of faces on the picture and their age (average age, in case there is more than one face)
- background and foreground colors
- hash tags. The way to represent hash tags in a table is called one-hot encoding - each tag would be represented by a column, which will contain 1 if the tag corresponds to the picture, and 0 otherwise.
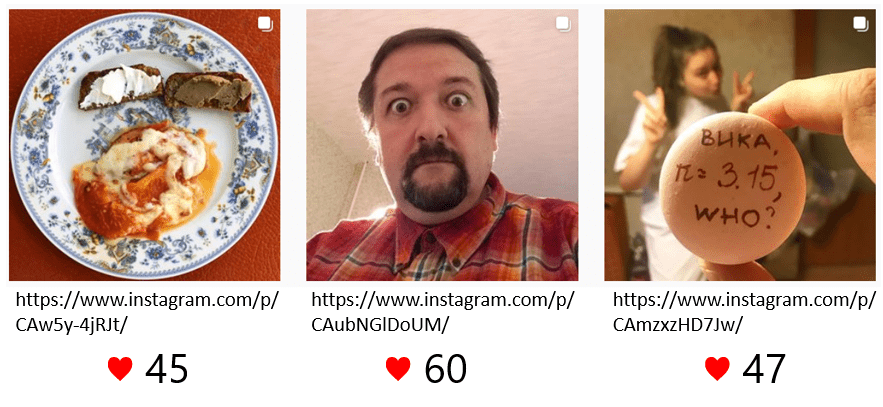
| Date | URL | Likes | Category | Faces | Age | Selfie | Macaron |
|---|
| 25.05.2020 | CAw5y-4jRJt | 45 | Food | 0 | 0 | 0 | 0 |
| 20.05.2020 | CAubNGlDoUM | 60 | Selfie | 1 | 45 | 1 | 0 |
| 13.05.2020 | CAmzxzHD7Jw | 47 | Food | 1 | 19 | 0 | 1 |
We would also probably want to add date as a feature. Adding a date can be tricky, because models work best on numbers, and date is not just a number. So we would probably want to represent a date by a number of days from the start date, and also add “day of week” as another feature, because popularity of a post might very much depend on the day. We might also want to add “weekend” binary feature to try and detect change in activity on weekends.
A lot of thinking was put into the original design of a dataset, and the whole question on which data to collect. This process is often more important than actual model training, and it can be done without coding.
Sometimes the process of data preparation can be done using Excel, and calling Cognitive Services on a dataset can be achieved using Power Apps (this document describes how) or Microsoft Flow.
In this example, I have already prepared the dataset for you. It is available in the form of CSV-table here.

Now that we have the data, we can start model training! And even this seemingly most difficult step can be achieved without coding!
Azure Machine Learning
I will show you how one can train the model without coding using Microsoft’s main Machine Learning service - Azure Machine Learning. This service is designed both for professional data scientists, who need to handle huge data and computational workloads, and for beginners, who are just making their first steps into Machine Learning. There are two particularly useful technologies for beginners: AutoML and Designer. The process of using AutoML from start to finish without coding is described in the documentation, but we will also outline it here.
To start working with Azure ML, you need to create a Workspace. You can either start following my tutorial, or official documentation. A workspace groups together everything related to your machine learning task: data, computing resources, experiment results, and trained models.
Defining a Dataset
To begin with, we need to create a Dataset. Since we would be using a dataset from the Internet, we just need to specify the URL of the CSV file.
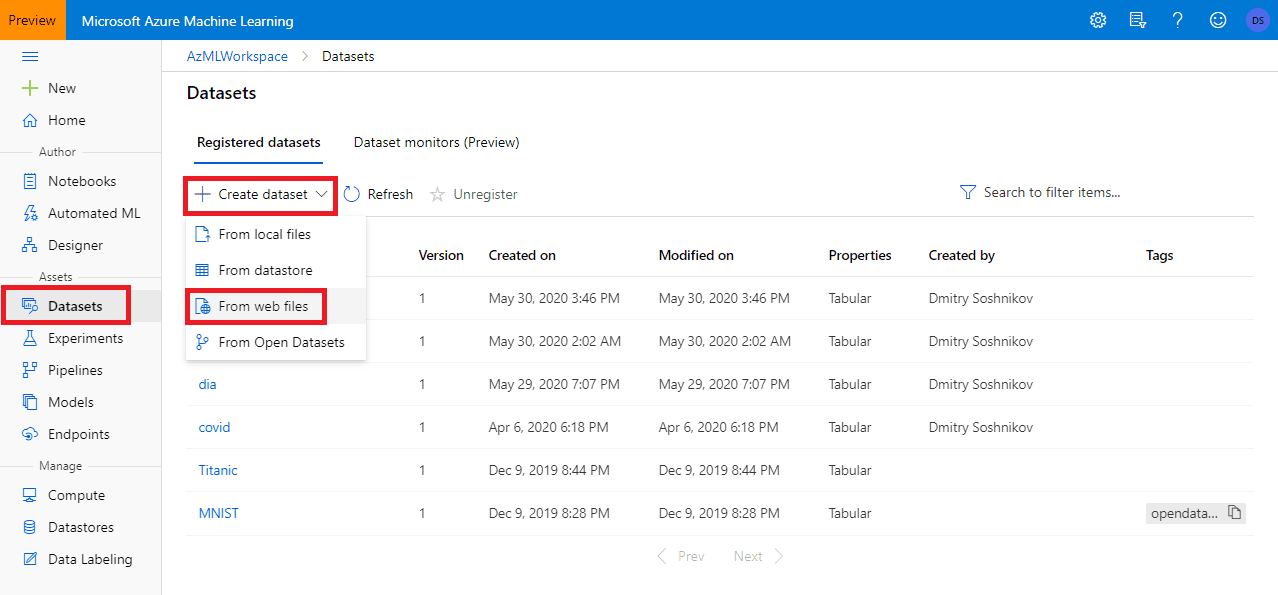
Select an option Create dataset from Web files, specify tabular dataset type, and select an option to use first row as headers. You should see the screen like this with the preview of data:
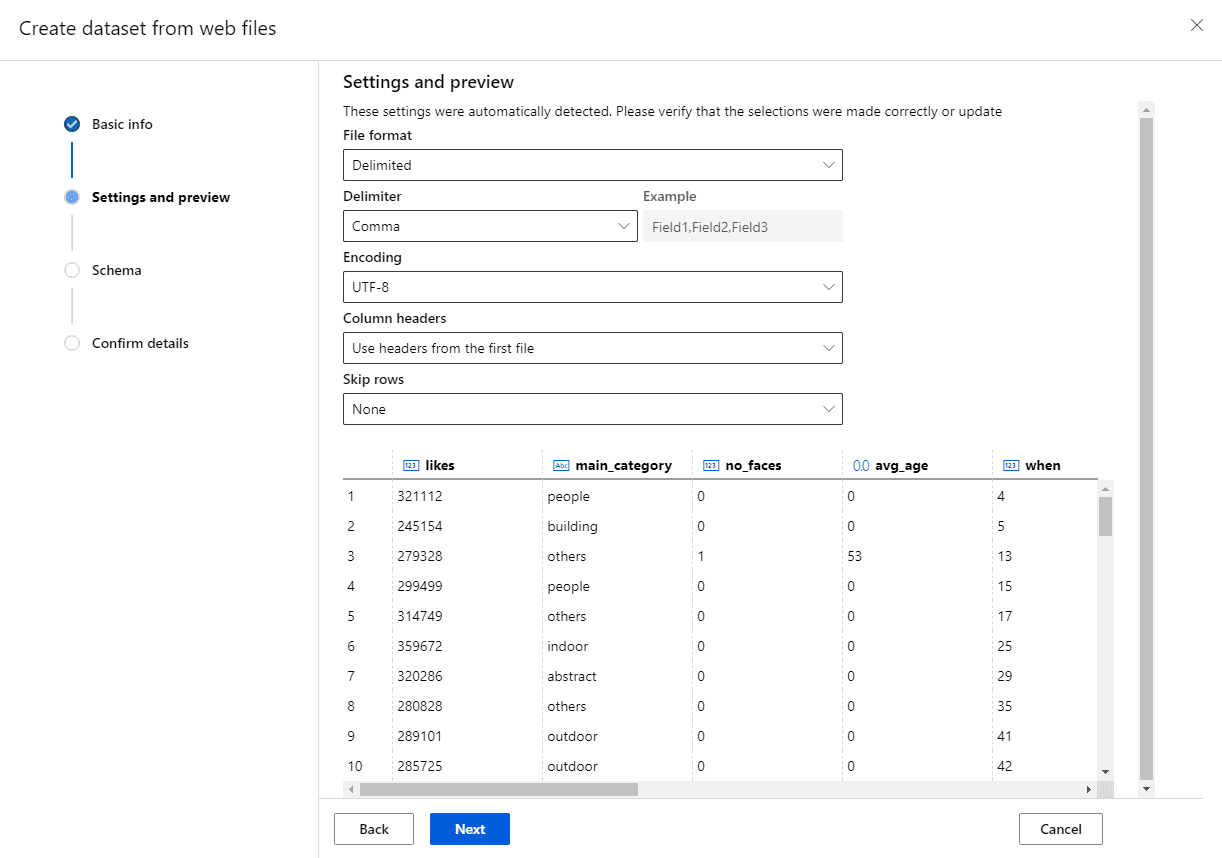
After creating the dataset it can be found in the Dataset section, and you can look at the data and explore them in various ways:

Training AutoML Model
Having the dataset, you can train different machine learning models on it. However, if you are not a data scientist, you probably do not know which model to use. Also, it might happen that some columns in your dataset need to be excluded from training, for example the URL field, which does not carry useful information for predictions, because each URL appears in the dataset only once.
Automatic ML is a technology that tries to train different machine learning algorithms until it finds the best one. It also performs some clever feature analysis to exclude meaningless columns, as well as do some extra featurization if needed. If the problem is solvable - it can typically find quite a good model. Of course, this comes at a cost of spending more computing power on trying many possible models, but computing power is definitely easier to find than a good machine learning professional.
To use Auto ML, you only need a few simple steps:
- Click Automated ML in the ML Portal and select the dataset to use.
- Chose an experiment name and target column. In our example, we need to predict number of likes, so the target column would be
likes. 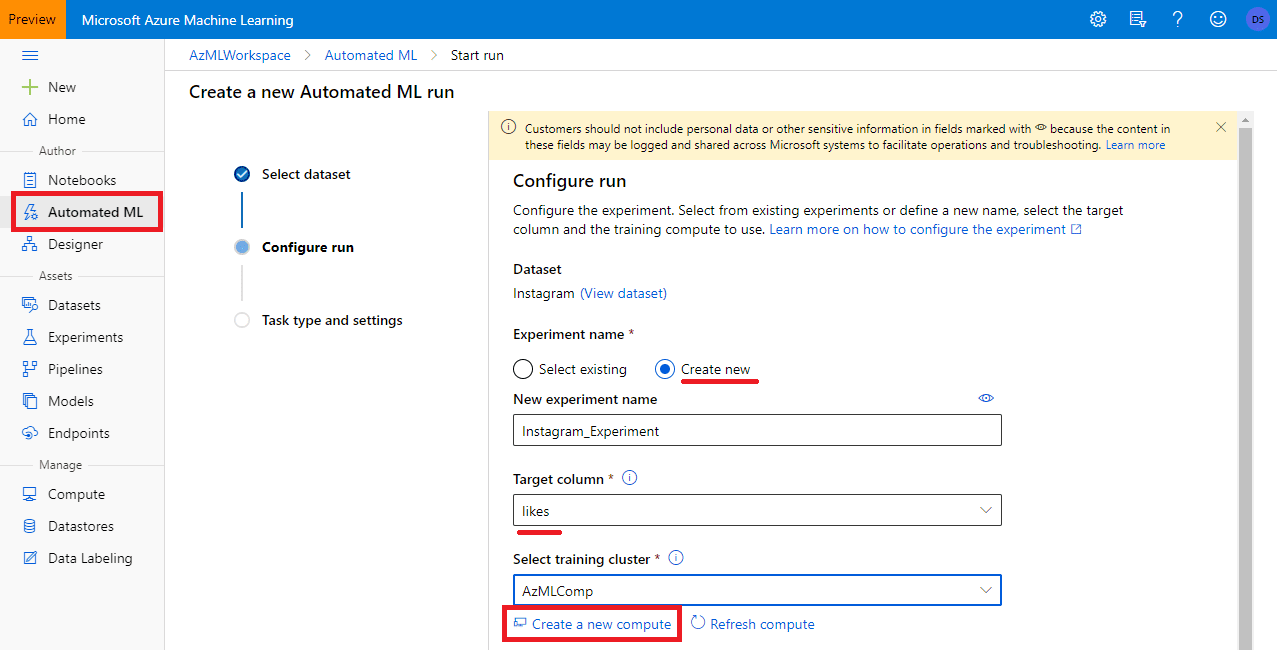
- You need some compute to train the model on. You need to create a new compute, and specify a cluster. It is generally a good idea to set minimum number of nodes to 0, so that the cluster is automatically shut down when you are not performing any training. As for virtual machine type, for simple tasks like the one we are doing the cheapest option,
Standard_D1 should be enough. 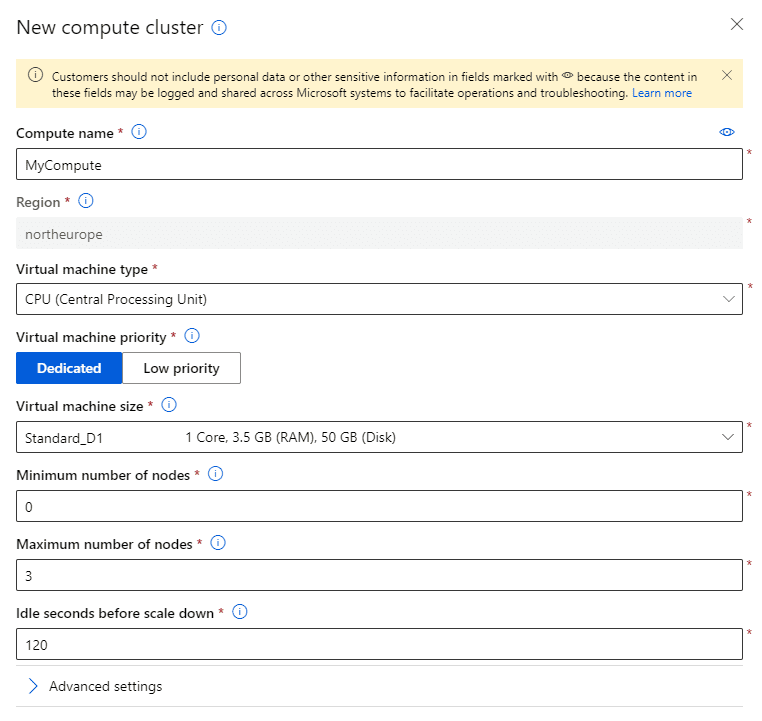
- On the next page, you select a task type: classification, regression (our case) or time series forecasting. You can also change some of the configuration settings or featurization settings, if you know what you are doing.
- Click Finish.
After that, the experiment will get started. It will probably take quite a while before different models are trained - depending on the maximum value of nodes you specified in your cluster and the type of virtual machine. In my case, with 1 node of D1 it took something like 3 hours to find the optimal model.
You can find the experiment in the Experiments section of the portal: 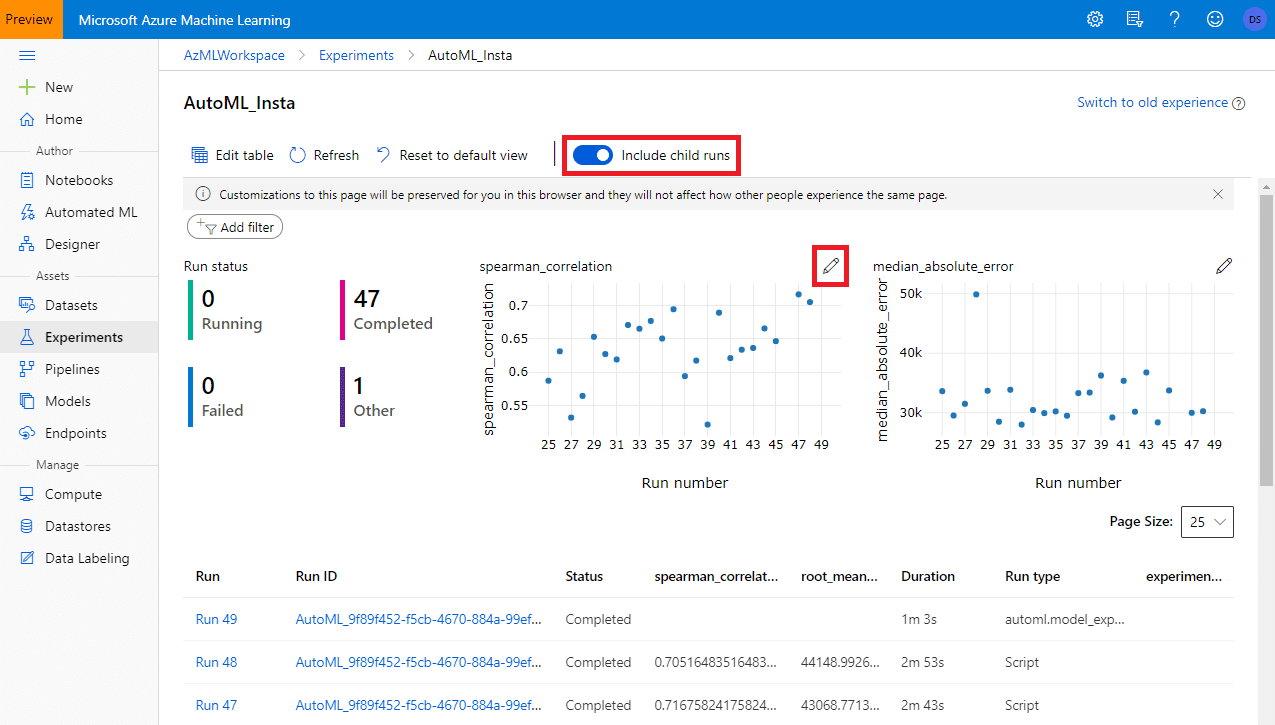 Initially, the experiment will contain just one run, but you need to click on Include child runs to show all different sub-experiments that trained different ML models. You may also need to adjust parameters of the graphs to get nice view of achieved degree of accuracy.
Now let’s uncheck Include child runs, and select the main experiment. Once the details page opens, click on Models to see the list of all algorithms that AutoML tried to train, with their corresponding achieved accuracy (in our case, because we are training regression models, we use spearman correlation to reflect the “quality” of the model): 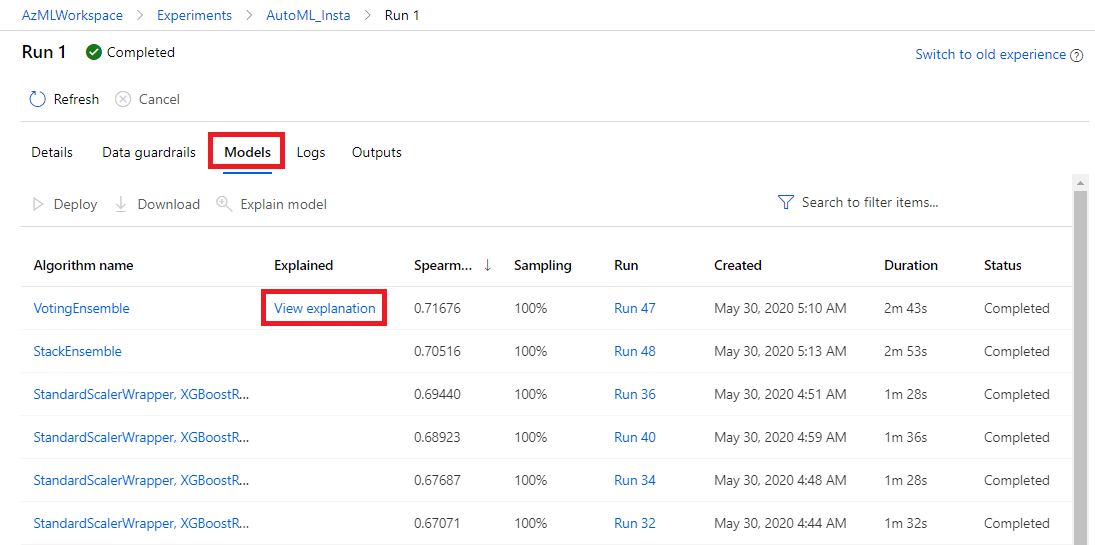
Understanding the Model
The trained model now allows us to predict number of likes to any photograph that we are planning to post. However, what we would rather want as a result is a set of recommendations on achieving better user reaction to the photograph. In other words, we want to understand which features affect the result, and how.
Model Interpretability allows us to understand the model better, by seeing how different features affect the final result.
When training a model using AutoML, by default Azure ML also runs interpretability experiment on the best model - that’s why you see View Explanation link next to the top model. Click on it to be taken to model explanations screen, where you can explore the effect different features play.  First of all, you can explore the importance of engineered features (this view is selected by default), or of original features. We can switch to original features view by changing the dropdown Select explanation to point to raw model.
In the diagram below you can see the feature importance. The most important feature is post date (when), followed by person hashtag, and then by number of faces, foreground colour and main category. This allows us to make a few conclusions about our problem domain:
- The most important factor in getting more likes is time. This is probably due to the fact that older posts are getting more likes with time, because they are discovered by more people over time
- Portrait posts (that have a large person picture) are getting more likes
- Overall colour of the photo plays rather important role
- Type of photograph is also important, but not as important as we might think. We need to investigate further which types of photos receive more attention
So, after creating machine learning model, thanks to interpretability, we are able to see, which factors contribute to popularity of a photograph. We can also use the model directly, by giving it a photograph as an input (passing it through cognitive services beforehand) - and it will predict estimated number of likes, so that we can test the potential candidates for publication and compare them.
More about the Course
The program that Microsoft and Udacity are announcing today will consist of two parts. First 10000 applicants will be offered first foundational couse Introduction to machine learning on Azure with a Low-code Experience. This course will go on for 2 months, and it will teach you how to make data-driven conclusions like this one, and how to train and use machine learning models almost without coding. It will include the following important topics:
- Data science process for solving problems
- Different types of data (tabular data, text, etc.) and preparing data
- Supervised vs. non-supervised learning
- Feature engineering
- Deep Learning vs. Machine Learning (i.e. when you should and when you should not use neural networks)
- Most important algorithms for classification, regression, clustering, etc.
- Responsible AI and AI Fairness
Best performers (selected based on results and degree of community participation) would then be offered to get a scholarship and enroll for complete Machine Learning Nanodegree program with Microsoft Azure.
If you have not seriously tried Data Science before - I definitely encourage you to sign up for this course and get the taste of Data Science, as well as tell your non-developer friends about the course. It has never been easier to start this journey!
References